/*
modified on Sep 14, 2020
Modified by MohammedDamirchi from https://github.com/adafruit/TSL2561-Arduino-Library.git
https://electropeak.com/learn/
*/

#include <Wire.h>
#include "TSL2561.h"

// Example for demonstrating the TSL2561 library - public domain!

// connect SCL to analog 5
// connect SDA to analog 4
// connect VDD to 3.3V DC
// connect GROUND to common ground
// ADDR can be connected to ground, or vdd or left floating to change the i2c address

// The address will be different depending on whether you let
// the ADDR pin float (addr 0x39), or tie it to ground or vcc. In those cases
// use TSL2561_ADDR_LOW (0x29) or TSL2561_ADDR_HIGH (0x49) respectively
TSL2561 tsl(TSL2561_ADDR_FLOAT);

void setup(void) {
  Serial.begin(9600);

  if (tsl.begin()) {
    Serial.println("Found sensor");
  } else {
    Serial.println("No sensor?");
    while (1);
  }

  // You can change the gain on the fly, to adapt to brighter/dimmer light situations
  //tsl.setGain(TSL2561_GAIN_0X);         // set no gain (for bright situtations)
  tsl.setGain(TSL2561_GAIN_16X);      // set 16x gain (for dim situations)

  // Changing the integration time gives you a longer time over which to sense light
  // longer timelines are slower, but are good in very low light situtations!
  tsl.setTiming(TSL2561_INTEGRATIONTIME_13MS);  // shortest integration time (bright light)
  //tsl.setTiming(TSL2561_INTEGRATIONTIME_101MS);  // medium integration time (medium light)
  //tsl.setTiming(TSL2561_INTEGRATIONTIME_402MS);  // longest integration time (dim light)

  // Now we're ready to get readings!
}

void loop(void) {
  // Simple data read example. Just read the infrared, fullspecrtrum diode
  // or 'visible' (difference between the two) channels.
  // This can take 13-402 milliseconds! Uncomment whichever of the following you want to read
  uint16_t x = tsl.getLuminosity(TSL2561_VISIBLE);
  //uint16_t x = tsl.getLuminosity(TSL2561_FULLSPECTRUM);
  //uint16_t x = tsl.getLuminosity(TSL2561_INFRARED);

  Serial.print(x, DEC);
  Serial.print("\t");
  // More advanced data read example. Read 32 bits with top 16 bits IR, bottom 16 bits full spectrum
  // That way you can do whatever math and comparisons you want!
  uint32_t lum = tsl.getFullLuminosity();
  uint16_t ir, full;
  ir = lum >> 16;
  full = lum & 0xFFFF;
  Serial.print("IR: "); Serial.print(ir);   Serial.print("\t\t");
  Serial.print("Full: "); Serial.print(full);   Serial.print("\t");
  Serial.print("Visible: "); Serial.print(full - ir);   Serial.print("\t");
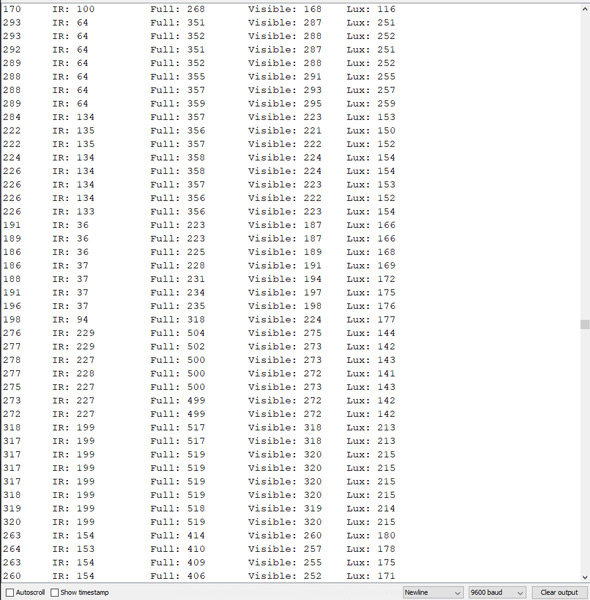
پس از اجرای کد تصویر زیر را در خروجی سریال مشاهده میکنید.