
مقدمه
آیا میخواهید قابلیتهای ارتباط اترنت را به پروژههای خود اضافه کنید؟ در این راهنمای جامع، با استفاده از ماژول ENC28J60 به دنیای ارتباطات اترنت با آردوینو خواهیم پرداخت. چه مبتدی باشید و چه از علاقه¬مندان با تجربه آردوینو، این راهنما برای شما مفید خواهد بود. ما در این آموزش شما را با فرآیند راهاندازی ماژول ENC28J60 آشنا کرده و دستورالعملهای گام به گام و نکات کلیدی را ارائه میدهیم. از طریق توضیحات ساده و مثال عملی، نحوه ایجاد اتصالات TCP/IP، ارسال و دریافت دادهها و ایجاد وب سرور خود با استفاده از ماژول ENC28J60 را خواهید آموخت.
در پایان این راهنما، بر ارتباطات اترنت با آردوینو و ایجاد پروژههای چشمگیری که به شبکه جهانی وب متصل میشوند تسلط پیدا خواهید کرد.
آنچه در این آموزش یاد میگیرید
• آشنایی با ارتباط اترنت
• آشنایی با روش ایجاد سرور به صورت محلی
• آشنایی با روش اتصال به سرور به صورت کلاینت و خواندن اطلاعات از روی سرور
پایههای (Pinout) ماژول اترنت ENC28J60
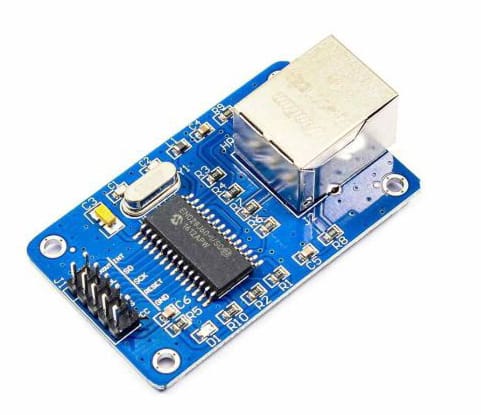
این ماژول، مجهز به کنترلر شبکه اترنت ENC28J60 است که از پروتکلهای مختلف شبکه پشتیبانی میکند. با توجه به داشتن رابط SPI، برقراری ارتباط بین آن و میکروکنترلر بسیار ساده است. حداکثر سرعت انتقال داده این آی سی، Mbps 10 است که برای بسیاری از کاربردها کافی میباشد. این ماژول دارای 10 پایه است که در تصویر زیر مشاهده میکنید.
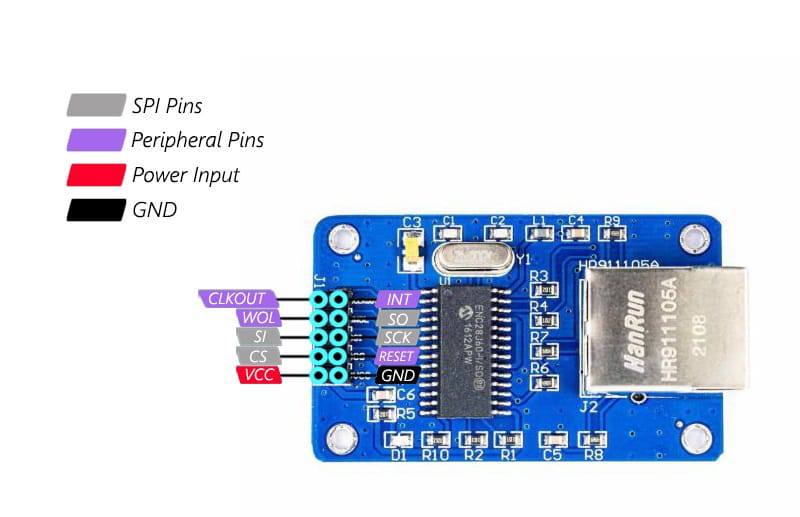
- عملکرد پایهها به صورت زیر است:
CLKOUT: خروجی کلاک قابل برنامه ریزی - INT: خروجی وقفه به صورت Active-low
- WOL: Wake on LAN
- SO: MISO، خروجی دیتا SPI
- SI: MOSI، ورودی دیتا SPI
- SCK: کلاک SPI
- CS: CHIP Select مخصوص SPI
- RESET: ورودی ریست به صورت Active-low
- VCC: تغذیه ماژول
- GND: زمین ماژول
کاربردهای ماژول شبکه ENC28J60
• سنسورهاي تحت شبكه
• مونيتورينگ تجهيزات پزشكي و آزمايشگاهي
• كنترل سيستمها و تجهيزات برقي و الكترونيكي از طریق اينترنت
• شبكه كردن مجموعهاي از ميكروكنترلرهايي كه با فاصله زياد از هم قرار دارند
• وب سرورهاي اينترنتي
لوازمی که به آن احتیاج دارید
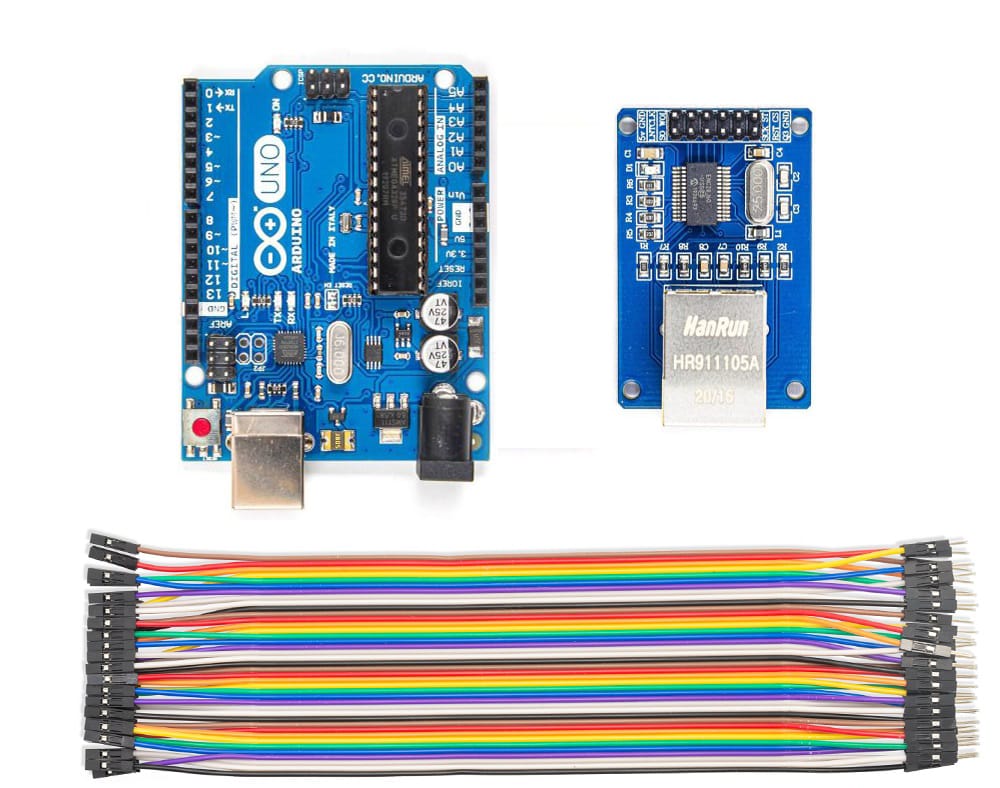
قطعات مورد نیاز برای ساخت هر دست server یا client به شرح زیر است. با توجه به نیاز پروژه، تعداد آنها را تعیین کنید.
*: از هر برد آردوینوی دیگر نیز میتوانید استفاده کنید.
ایجاد وب سرور با آردوینو و ماژول ENC28J60
در گام اول، با استفاده از برد آردوینو و ماژول ENC28J60، یک وب سرور میسازیم. برای اینکار، مراحل زیر را به ترتیب انجام دهید.
سیمبندی
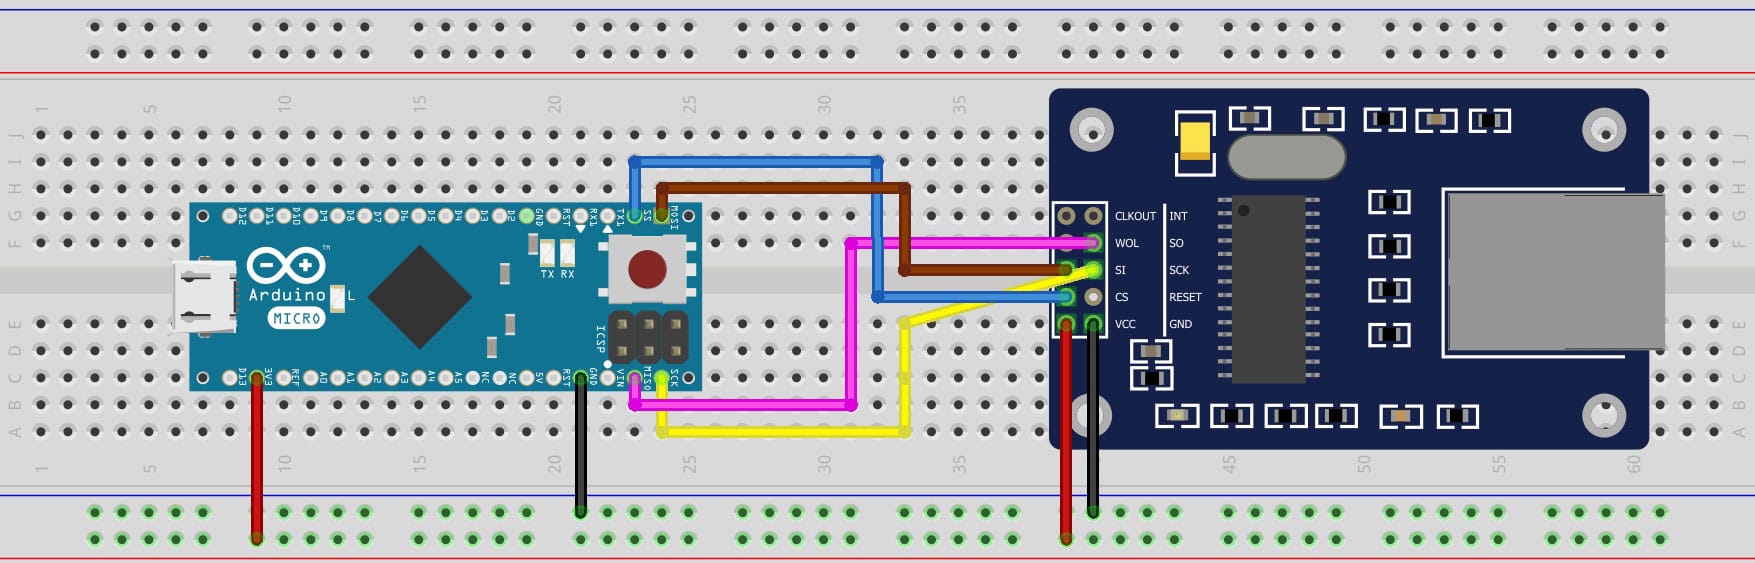
قطعات را همانند تصویر زیر به هم وصل کنید (پایههای SPI آردوینو را به پایههای SPI ماژول اترنت متصل کنید).
کد ایجاد Web server
قبل از اینکه به سراغ کدنویسی بروید، ابتدا کتابخانه EthernetENC را از طریق این لینک دانلود کرده و آن را در نرمافزار آردوینو نصب کنید.
حال به سراغ کد وب سرور میرویم. آردوینو توسط این کد، 6 ورودی آنالوگ را میخواند و آنها را با فرمتی مشخص بر روی صفحه وب سرور به نمایش میگذارد.
توضیحات کد به صورت کامنت در آن درج شده است. با مطالعه آنها میتوانید جزئیات مراحل مختلف کد را بفهمید.
/*
modified on OCT 23, 2023
Modified by MajidMerati from Arduino Examples
<blockquote class="wp-embedded-content" data-secret="lz5bg5GpfG"><a href="https://electropeak.com/learn/">Home</a></blockquote><iframe loading="lazy" class="wp-embedded-content" sandbox="allow-scripts" security="restricted" style="position: absolute; clip: rect(1px, 1px, 1px, 1px);" title="“Home” — Electropeak" src="about:blank" data-secret="lz5bg5GpfG" width="600" height="338" frameborder="0" marginwidth="0" marginheight="0" scrolling="no" data-rocket-lazyload="fitvidscompatible" data-lazy-src="https://electropeak.com/learn/embed/#?secret=tOOEILtMfp#?secret=lz5bg5GpfG"></iframe><noscript><iframe class="wp-embedded-content" sandbox="allow-scripts" security="restricted" style="position: absolute; clip: rect(1px, 1px, 1px, 1px);" title="“Home” — Electropeak" src="https://electropeak.com/learn/embed/#?secret=tOOEILtMfp#?secret=lz5bg5GpfG" data-secret="lz5bg5GpfG" width="600" height="338" frameborder="0" marginwidth="0" marginheight="0" scrolling="no"></iframe></noscript>
*/
#include <SPI.h>
#include <EthernetENC.h>
// Enter a MAC address and IP address for your controller below.
// The IP address will be dependent on your local network:
byte mac[] = {
0xDE, 0xAD, 0xBE, 0xEF, 0xFE, 0xED
};
IPAddress ip(192, 168, 6, 101);
// Initialize the Ethernet server library
// with the IP address and port you want to use
// (port 80 is default for HTTP):
EthernetServer server(80);
void setup() {
// You can use Ethernet.init(pin) to configure the CS pin
//Ethernet.init(10); // Most Arduino shields
//Ethernet.init(5); // MKR ETH shield
//Ethernet.init(0); // Teensy 2.0
//Ethernet.init(20); // Teensy++ 2.0
//Ethernet.init(15); // ESP8266 with Adafruit Featherwing Ethernet
//Ethernet.init(33); // ESP32 with Adafruit Featherwing Ethernet
// Open serial communications and wait for port to open:
Serial.begin(9600);
while (!Serial) {
; // wait for serial port to connect. Needed for native USB port only
}
Serial.println("Ethernet WebServer Example");
// start the Ethernet connection and the server:
Ethernet.begin(mac, ip);
// Check for Ethernet hardware present
if (Ethernet.hardwareStatus() == EthernetNoHardware) {
Serial.println("Ethernet shield was not found. Sorry, can't run without hardware. :(");
while (true) {
delay(1); // do nothing, no point running without Ethernet hardware
}
}
if (Ethernet.linkStatus() == LinkOFF) {
Serial.println("Ethernet cable is not connected.");
}
// start the server
server.begin();
Serial.print("server is at ");
Serial.println(Ethernet.localIP());
}
void loop() {
// listen for incoming clients
EthernetClient client = server.available();
if (client) {
Serial.println("new client");
// an http request ends with a blank line
boolean currentLineIsBlank = true;
while (client.connected()) {
if (client.available()) {
char c = client.read();
Serial.write(c);
// if you've gotten to the end of the line (received a newline
// character) and the line is blank, the http request has ended,
// so you can send a reply
if (c == '\n' && currentLineIsBlank) {
// send a standard http response header
client.println("HTTP/1.1 200 OK");
client.println("Content-Type: text/html");
client.println("Connection: close"); // the connection will be closed after completion of the response
client.println("Refresh: 5"); // refresh the page automatically every 5 sec
client.println();
client.println("<!DOCTYPE HTML>");
client.println("<html>");
// output the value of each analog input pin
for (int analogChannel = 0; analogChannel < 6; analogChannel++) {
int sensorReading = analogRead(analogChannel);
client.print("analog input ");
client.print(analogChannel);
client.print(" is ");
client.print(sensorReading);
client.println("<br />");
}
client.println("</html>");
break;
}
if (c == '\n') {
// you're starting a new line
currentLineIsBlank = true;
} else if (c != '\r') {
// you've gotten a character on the current line
currentLineIsBlank = false;
}
}
}
// give the web browser time to receive the data
delay(1);
// close the connection:
client.stop();
Serial.println("client disconnected");
}
}
توضیحات کد:
قبل از اقدام به پروگرام کردن برد آردوینوی خود، موارد زیر را انجام دهید:
1) در خط 13، MAC address منحصر به فردی را وارد کنید.
2) آدرس IP سرور را در خط 15 بنویسید.
3) شماره پورت مد نظر خود را در خط 20 وارد کنید.
4) در صورتی که پایه CS ماژول اترنت به پایهای غیر از پایه SS آردوینو وصل شده است، شماره پایه را در خط 24 تغییر دهید. همچنین در صورت استفاده از بردهایی غیر از آردوینو (مانند Teensy، ESP8266 یا ESP32) گزینه مناسب برای شماره پایه CS را از بین خطوط 25 تا 29 انتخاب کنید.
5) در خطوط 85 تا 89، می¬توانید متن نمایش داده شده بر روی وب سرور را تغییر دهید.
پس از انجام تنظیمات فوق، کد را آپلود کنید.
پس از چند ثانیه، وب سرور شما فعال میشود. وارد نرمافزار مرورگر شده و آدرس IP سرور خود را در قسمت URL وارد کنید. آدرس پیشفرض این کد 192.168.6.101 است. با این کار، صفحه زیر را مشاهده خواهید کرد.
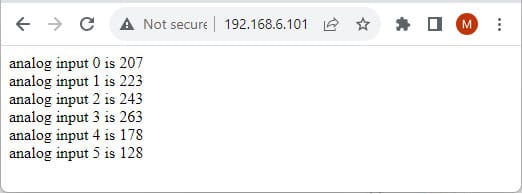
همانطور که مشاهده میکنید، ورودیهای 6 کانال آنالوگ در این صفحه نمایش داده شده است.
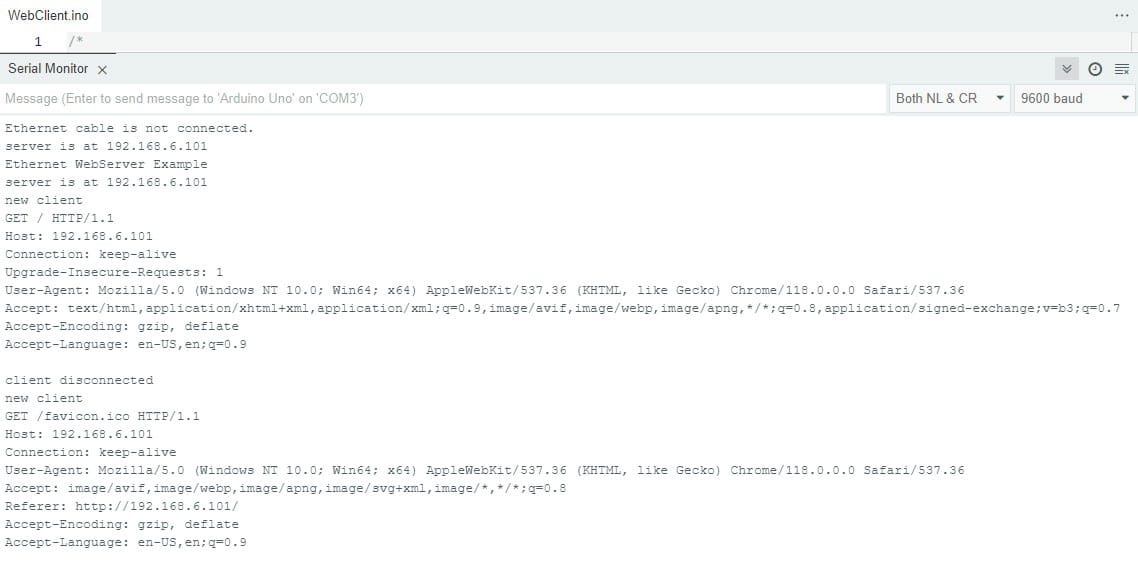
حال پنجره Serial Monitor را از نرمافزار آردوینو باز کنید. در صورت اتصال صحیح همه سیمها و کابل LAN و انجام صحیح تنظیمات، خروجی زیر نمایش داده خواهد شد.
ایجاد کلاینت (Client) با آردوینو و ماژول ENC28J60
در این قسمت، نحوه ایجاد یک کلاینت و اتصال آن به سرور را آموزش خواهیم داد. مدار این قسمت را مشابه قسمت قبل، سیم کشی کنید.
کد نوشته شده برای سمت کلاینت، تلاش میکند تا به وب سرور ساخته شده در قسمت قبل وصل شده و اطلاعات آن را دریافت کند. سپس از بین اطلاعات دریافتی، مقادیر آنالوگ درج شده را جدا کرده و در پورت سریال نمایش میدهد.
کد ایجاد Client
توضیحات کد در هر بخش به صورت کامنت نوشته شده است. برای فهم بهتر روند اجرای کد، میتوانید آنها را مطالعه کنید.
/*
modified on OCT 23, 2023
Modified by MajidMerati from Arduino Examples
<blockquote class="wp-embedded-content" data-secret="lz5bg5GpfG"><a href="https://electropeak.com/learn/">Home</a></blockquote><iframe loading="lazy" class="wp-embedded-content" sandbox="allow-scripts" security="restricted" style="position: absolute; clip: rect(1px, 1px, 1px, 1px);" title="“Home” — Electropeak" src="about:blank" data-secret="lz5bg5GpfG" width="600" height="338" frameborder="0" marginwidth="0" marginheight="0" scrolling="no" data-rocket-lazyload="fitvidscompatible" data-lazy-src="https://electropeak.com/learn/embed/#?secret=tOOEILtMfp#?secret=lz5bg5GpfG"></iframe><noscript><iframe class="wp-embedded-content" sandbox="allow-scripts" security="restricted" style="position: absolute; clip: rect(1px, 1px, 1px, 1px);" title="“Home” — Electropeak" src="https://electropeak.com/learn/embed/#?secret=tOOEILtMfp#?secret=lz5bg5GpfG" data-secret="lz5bg5GpfG" width="600" height="338" frameborder="0" marginwidth="0" marginheight="0" scrolling="no"></iframe></noscript>
*/
#include <SPI.h>
#include <EthernetENC.h>
// if you don't want to use DNS (and reduce your sketch size)
// use the numeric IP instead of the name for the server:
char server_char[4] = {192, 168, 6, 101};
IPAddress server_num(server_char[0], server_char[1], server_char[2], server_char[3]); // numeric IP for Google (no DNS)
//char server_name[] = "just1look.ir"; // name address for Google (using DNS)
//Define port No.
int HTTP_PORT = 80;
// Enter a MAC address for your controller below.
// Newer Ethernet shields have a MAC address printed on a sticker on the shield
byte mac[6] = {0x54, 0x55, 0x58, 0x10, 0x00, 0x24};
// Set the static IP address to use if the DHCP fails to assign
IPAddress ip(192, 168, 6, 102);
IPAddress myDns(192, 168, 6, 1);
// Initialize the Ethernet client library
// with the IP address and port of the server
// that you want to connect to (port 80 is default for HTTP):
EthernetClient client;
// Variables to measure the speed
unsigned long beginMicros, endMicros;
unsigned long byteCount = 0;
bool printWebData = true; // set to false for better speed measurement
void setup() {
// You can use Ethernet.init(pin) to configure the CS pin
Ethernet.init(10); // Most Arduino shields
//Ethernet.init(5); // MKR ETH shield
//Ethernet.init(0); // Teensy 2.0
//Ethernet.init(20); // Teensy++ 2.0
//Ethernet.init(15); // ESP8266 with Adafruit Featherwing Ethernet
//Ethernet.init(33); // ESP32 with Adafruit Featherwing Ethernet
// Open serial communications and wait for port to open:
Serial.begin(9600);
while (!Serial) {
; // wait for serial port to connect. Needed for native USB port only
}
// start the Ethernet connection:
Serial.println("Initialize Ethernet with DHCP:");
if (Ethernet.begin(mac) == 0) {
Serial.println("Failed to configure Ethernet using DHCP");
// Check for Ethernet hardware present
if (Ethernet.hardwareStatus() == EthernetNoHardware) {
Serial.println("Ethernet shield was not found. Sorry, can't run without hardware. :(");
while (true) {
delay(1); // do nothing, no point running without Ethernet hardware
}
}
if (Ethernet.linkStatus() == LinkOFF) {
Serial.println("Ethernet cable is not connected.");
}
// try to congifure using IP address instead of DHCP:
Ethernet.begin(mac, ip, myDns);
} else {
Serial.print(" DHCP assigned IP ");
Serial.println(Ethernet.localIP());
}
// give the Ethernet shield a second to initialize:
delay(1000);
Serial.print("connecting to ");
#ifdef server_name
Serial.print(server_name);
#else
Serial.print(server_num);
#endif
Serial.println("...");
// if you get a connection, report back via serial:
#ifdef server_name
if (client.connect(server_name, HTTP_PORT)) {
#else
if (client.connect(server_num, HTTP_PORT)) {
#endif
Serial.print("connected to ");
Serial.println(client.remoteIP());
// Make a HTTP request:
client.println("GET / HTTP/1.1");
#ifdef server_num
client.print("Host:"); client.print(server_char[0]); client.print(','); client.print(server_char[1]); client.print(','); client.print(server_char[2]); client.print(','); client.println(server_char[3]);
#endif
#ifdef server_name
client.print("Host:"); client.println(server_name);
#endif
client.println("Connection: close");
client.println();
} else {
// if you didn't get a connection to the server:
Serial.println("connection failed");
}
beginMicros = micros();
}
void loop() {
// if there are incoming bytes available
// from the server, read them and print them:
int len = client.available();
if (len > 0) {
// byte buffer[80];
// if (len > 80) len = 80;
// client.read(buffer, len);
String value;
int Analog[6];
while (true) {
value = client.readStringUntil('\n');
value.trim();
if (value.startsWith("analog input")) {
value.remove(0, 13);
value.trim();
Analog[value.substring(0, 1).toInt()] = value.substring(value.indexOf('s') + 1, value.indexOf('<')).toInt();
}
else if (value.startsWith("</html>")) {
break;
}
Serial.println(value);
}
for(int i=0;i<6;i++){
Serial.println(Analog[i]);
}
// if (printWebData) {
// Serial.write(buffer, len); // show in the serial monitor (slows some boards)
// }
// byteCount = byteCount + len;
}
// if the server's disconnected, stop the client:
if (!client.connected()) {
endMicros = micros();
Serial.println();
Serial.println("disconnecting.");
client.stop();
Serial.print("Received ");
Serial.print(byteCount);
Serial.print(" bytes in ");
float seconds = (float)(endMicros - beginMicros) / 1000000.0;
Serial.print(seconds, 4);
float rate = (float)byteCount / seconds / 1000.0;
Serial.print(", rate = ");
Serial.print(rate);
Serial.print(" kbytes/second");
Serial.println();
// do nothing forevermore:
while (true) {
delay(1);
}
}
}
توضیحات کد:
قبل از پروگرام کردن آردوینو، تنظیمات زیر را بر روی کد اعمال کنید.
1) آدرس آی پی سرور را در خط 12 بنویسید. در صورتی که دارای سرور و هاست غیر Local هستید، میتوانید آدرس URL سرور خود را در خط 14 وارد کنید. برای این کار، باید خط 12 و 13 کامنت شده و خط 14 از حالت کامنت خارج شود.
2) شماره پورت را در خط 17 وارد کنید.
3) MAC address منحصر به فردی را در خط 21 بنویسید.
4) آدرس آی پی که میخواهید کلاینت شما داشته باشد را در خط 24 وارد کنید.
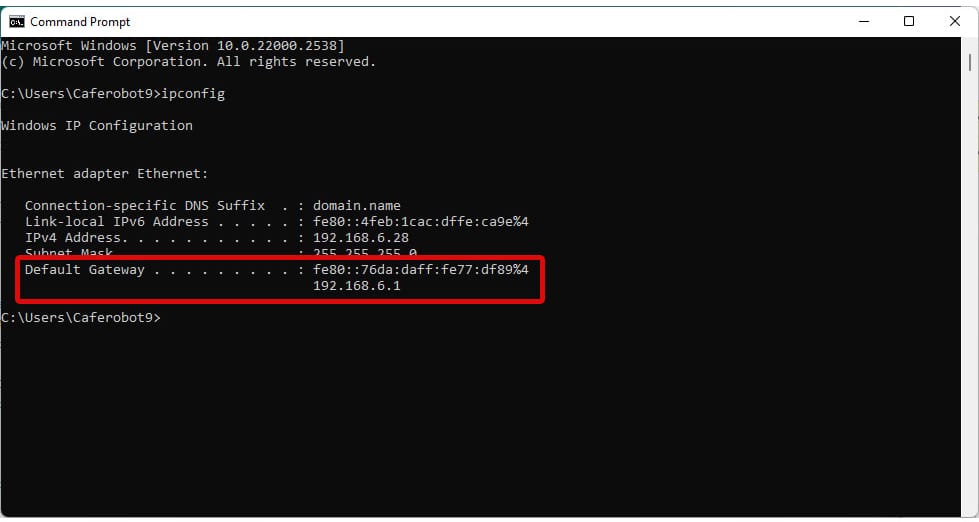
5) تنظیمات DNS را در خط 25 تغییر دهید. معمولاً در شبکههای خانگی، مقدار 192.168.1.1 جواب خواهد داد. برای اطمینان از آن، میتوانید نرمافزار CMD را باز کرده و لغت ipconfig را وارد کنید. در تصویر زیر، نتیجه اجرای این دستور و DNS یا Gateway سیستم نمایش داده شده است.
6) در صورتی که برای اتصال پایه CS ماژول اترنت به آردوینو، از پایهای غیر از پایه SS آردوینو استفاده کردید، باید شماره آن را در خط 39 بنویسید.
7) در صورت استفاده از بردهایی غیر از آردوینو، آن را از میان خطوط 40 تا 44 انتخاب کنید.
8) همه مقادیر آنالوگ درج شده بر روی وب سرور، تا خط 130 در دسترس قرار میگیرند. میتوانید از آن استفاده کنید.
پس از انجام تنظیمات فوق، کد را بر روی آردوینو آپلود کرده و پنجره Serial Monitor را باز کنید. تصویر زیر نمایش داده خواهد شد.

همانطور که مشاهده میکنید کلاینت، ابتدا کل صفحه وب سرور را میخواند و سپس مقادیر آنالوگ را از میان آن جدا کرده و چاپ میکند.
یک گام جلوتر
در این پروژه، ابتدا با ماژول تبدیل اترنت ENC28J60 به SPI و انواع کاربردهای آن آشنا شدیم. سپس یاد گرفتیم که چگونه با استفاده از آن و بردهای آردوینو، یک وب سرور و کلاینت ایجاد کنیم تا بتوانند از طریق شبکه محلی با یکدیگر تبادل داده داشته باشند.
برای توسعه این پروژه، میتوانید کارهای زیر را انجام دهید:
• با اجاره یا خرید سرور و هاست، شبکه را از حالت محلی خارج کنید تا امکان برقراری ارتباط بین سرور و کلاینت از هر نقطه دنیا وجود داشته باشد.
• چندین کلاینت بسازید و آنها را به سرور متصل کنید. با این کار میتوانید اماکن را هوشمندسازی کنید.
• به جای آردوینو، از بردهای ESP32 استفاده کنید که تا حدودی قابلیت اجرای کدهای php را دارند. با این کار میتوانید از طرف کلاینت به سرور داده ارسال (POST) کنید.
• ماژولهای مختلفی به پروژه خود اضافه کنید، از جمله: رله، دماسنج، سنسور گاز، روشنایی و …
