ویژگی های ماژول کیبورد 3x4 لمسی MPR121
کلیدها یک از پرکاربردترین المانها در الکترونیک هستند. کیپد مجموعهای از کلیدهای متصل به هم میباشد. این کیپد لمسی بوده و از نوع خازنی است و دارای 12 کلید میباشد و آیسی آن MPR121 است.
از دیگر ویژگیهای این ماژول:
- ولتاژ کاری: 3.3 ولت
- پروتکل ارتباطی: I2C
- محدوده دمای کاری: 40- درجه سانتیگراد تا 85+ درجه سانتیگراد
دیتاشیت آی سی MPR121 را می توانید از اینجا دانلود کنید.
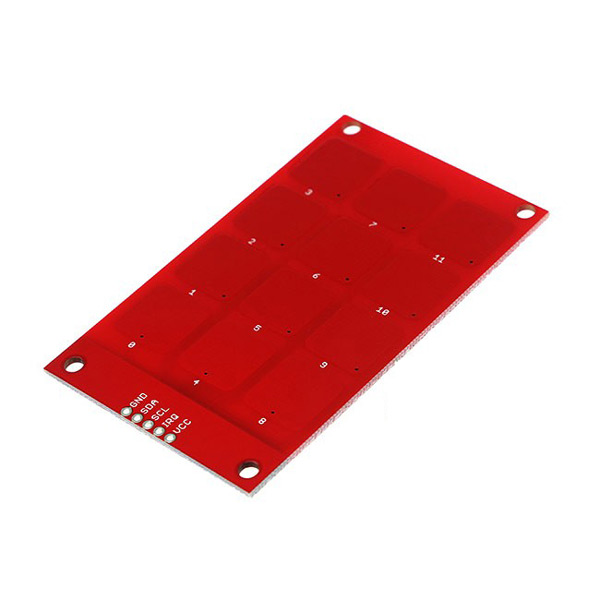
معرفی پایه های (Pinout) ماژول کیبورد 3x4 لمسی MPR121
کیپد 3×4 لمسی MPR121 دارای 5 پایه به شرح زیر است:
- VCC: تغذیه ماژول – 3.3 ولت
- GND: زمین
- SCL: پایه کلاک I2C
- SDA: پایه سریال I2C
- IRQ: پایه خروجی اینتراپت
پین اوت (Pinout) این ماژول را میتوانید در تصویر زیر مشاهده کنید.
لوازمی که به آن احتیاج دارید
قطعات مورد نیاز
نرم افزارهای مورد نیاز
راه اندازی ماژول کیبورد 3x4 لمسی MPR121 با آردوینو
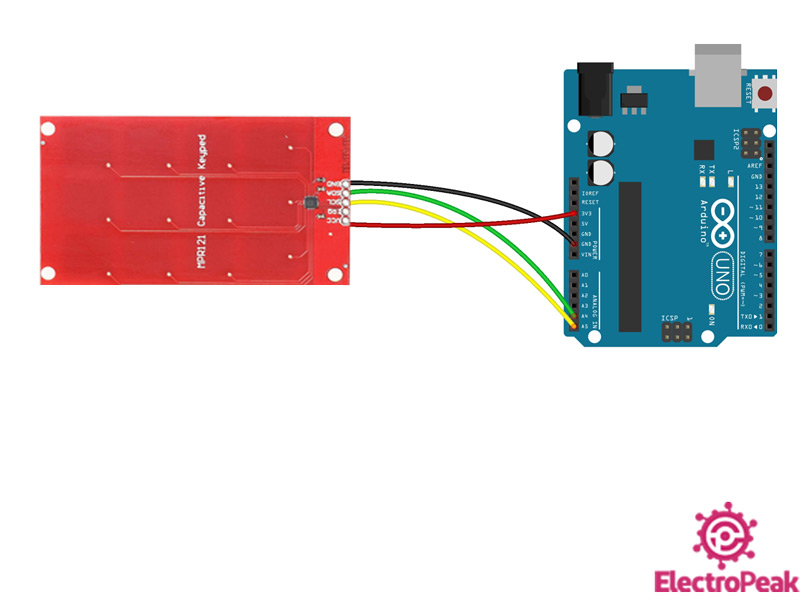
گام اول: سیم بندی
مطابق مدار زیر،کیپد را به آردوینو وصل کنید.
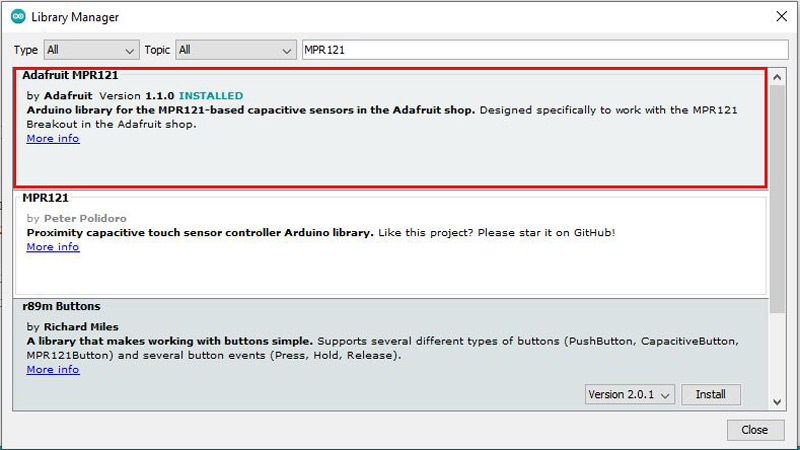
گام دوم: نصب کتابخانه
به Library manager رفته و با سرچ کلمه MPR121 ،کتابخانه ی زیر را نصب کنید.
گام سوم: کد
کد زیر را روی برد آردوینو آپلود کنید.
  /*
  3X4-MPR121-Capacitive-Touch-Keypad-Module
  Modified on 10 Jan 2021
  by Amir Mohammad Shojaee @ Electropeak
  Home

  based on Adafruit Library Example
*/

#include <Wire.h>
#include "Adafruit_MPR121.h"

#ifndef _BV
#define _BV(bit) (1 << (bit))
#endif

// You can have up to 4 on one i2c bus but one is enough for testing!
Adafruit_MPR121 cap = Adafruit_MPR121();

// Keeps track of the last pins touched
// so we know when buttons are 'released'
uint16_t lasttouched = 0;
uint16_t currtouched = 0;

void setup() {
  Serial.begin(9600);

  while (!Serial) { // needed to keep leonardo/micro from starting too fast!
    delay(10);
  }

  Serial.println("Adafruit MPR121 Capacitive Touch sensor test");

  // Default address is 0x5A, if tied to 3.3V its 0x5B
  // If tied to SDA its 0x5C and if SCL then 0x5D
  if (!cap.begin(0x5A)) {
    Serial.println("MPR121 not found, check wiring?");
    while (1);
  }
  Serial.println("MPR121 found!");
}

void loop() {
  // Get the currently touched pads
  currtouched = cap.touched();

  for (uint8_t i=0; i<12; i++) {
    // it if *is* touched and *wasnt* touched before, alert!
    if ((currtouched & _BV(i)) && !(lasttouched & _BV(i)) ) {
      Serial.print(i); Serial.print(" touched");
    }
    // if it *was* touched and now *isnt*, alert!
    if (!(currtouched & _BV(i)) && (lasttouched & _BV(i)) ) {
      Serial.println("       released");
    }
  }
  // reset our state
  lasttouched = currtouched;

  // comment out this line for detailed data from the sensor!
  return;

  // debugging info, what
  Serial.print("\t\t\t\t\t\t\t\t\t\t\t\t\t 0x"); Serial.println(cap.touched(), HEX);
  Serial.print("Filt: ");
  for (uint8_t i=0; i<12; i++) {
    Serial.print(cap.filteredData(i)); Serial.print("\t");
  }
  Serial.println();
  Serial.print("Base: ");
  for (uint8_t i=0; i<12; i++) {
    Serial.print(cap.baselineData(i)); Serial.print("\t");
  }
  Serial.println();

  // put a delay so it isn't overwhelming
  delay(100);
}
در ابتدای برنامه دو کتابخانه موردنیاز اضافه شدهاند. در ادامه برنامه نیز آدرس I2C وارد میشود.
با لمس هر یک از کلیدها، شماره آن کلید به همراه عبارت “Touched” در سریال مانیتور مشاهده میشود و سپس با برداشتن لمس از روی آن کلید، عبارت “Released” ظاهر میگردد.
خروجی کد به شکل زیر است. همانطور که مشاهده میکنید کلیدهای شماره 0 تا 11 به ترتیب لمس شدهاند.


