

ویژگی های نمایشگر 0.96 اینچ OLED
نمایشگرهای OLED، نمایشگر هایی با کنتراست و رزولوشن بالا می باشند، از این رو قابلیت خوانایی زیادی را برای کاربر فراهم می کند. این نمایشگرها نیاز به نور پس زمینه Backlight ندارند و پیکسل ها خودشان نور افشانی می کنند و در مقایسه با LCD های کریستال مایع، باریکتر و شفاف تر بوده وکنتراست بالاتر و مصرف توان کمتری دارند. چیپ درایور این ماژول SSD1306 است که توانایی ارتباط I2C را برای این ماژول فراهم می آورد.
SSD1306 یک ماژول درایور برای صفحه نمایش سیستم های نقطه ماتریسی می باشد و برای صفحه نمایش نوع کاتد مشترک استفاده می شود و در تجهیزات قابل حمل مانند تلفن موبایل، MP3 Player، ماشین حساب و کاربردهای مختلف دیگر به کار گرفته می شود.
جهت دریافت دیتاشیت نمایشگر OLED 0.96 اینچ اینجا کلیک کنید.
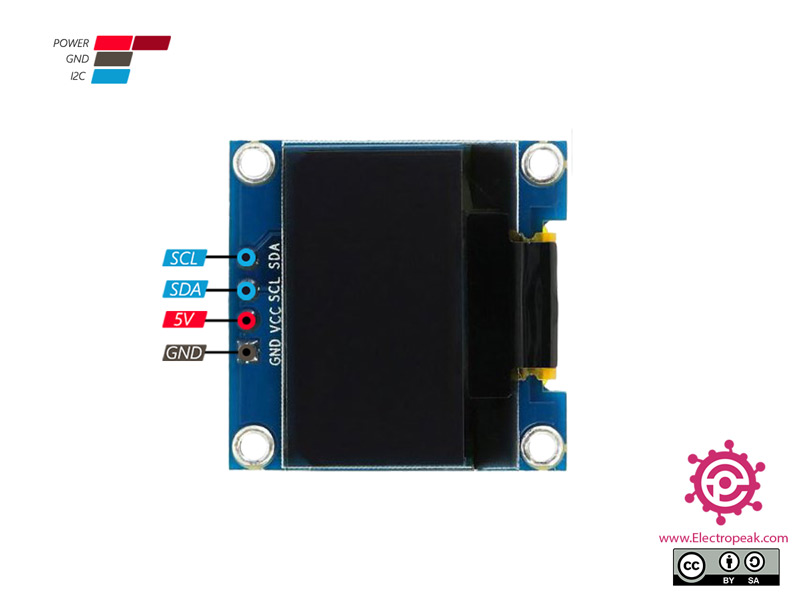
معرفی پایه ها (Pinout) نمایشگر 0.96 اینچ OLED
نمایشگر OLED 0.96 اینچ دارای 4 پایه به شرح زیر است:
- VCC: تغذیه نمایشگر – 5 ولت
- GND: زمین
- SLC: همزمان سازی برای پروتکل I2C
- SDA: اطلاعات برای پروتکل I2C
پین اوت (Pinout) این نمایشگر را می توانید در تصویر زیر مشاهده کنید.
لوازمی که به آن احتیاج دارید

قطعات مورد نیاز
نرم افزارهای مورد نیاز
راه اندازی ماژول نمایشگر 0.96 اینچ OLED با آردوینو
گام اول: سیم بندی
مطابق مدار زیر، نمایشگر را به آردوینو وصل کنید.

گام دوم: نصب کتابخانه
ابتدا کتابخانه زیر را بر آردوینوی خود نصب کنید.
توجه
اگر نیاز به راهنمایی بیشتر برای نصب کتابخانه بر روی آردوینو دارید، می توانید به آموزش نصب کتابخانه بر آردوینو مراجعه کنید.
گام سوم: کد
کد زیر را روی برد آردوینوی خود آپلود کنید.
    /*
  modified on Sep 28, 2020
  Modified by MohammedDamirchi from https://github.com/adafruit/Adafruit_SSD1306
  Home
*/


/**************************************************************************
 This is an example for our Monochrome OLEDs based on SSD1306 drivers

 Pick one up today in the adafruit shop!
 ------> http://www.adafruit.com/category/63_98

 This example is for a 128x32 pixel display using I2C to communicate
 3 pins are required to interface (two I2C and one reset).

 Adafruit invests time and resources providing this open
 source code, please support Adafruit and open-source
 hardware by purchasing products from Adafruit!

 Written by Limor Fried/Ladyada for Adafruit Industries,
 with contributions from the open source community.
 BSD license, check license.txt for more information
 All text above, and the splash screen below must be
 included in any redistribution.
 **************************************************************************/

#include <SPI.h>
#include <Wire.h>
#include <Adafruit_GFX.h>
#include <Adafruit_SSD1306.h>

#define SCREEN_WIDTH 128 // OLED display width, in pixels
#define SCREEN_HEIGHT 64 // OLED display height, in pixels

// Declaration for an SSD1306 display connected to I2C (SDA, SCL pins)
#define OLED_RESET     4 // Reset pin # (or -1 if sharing Arduino reset pin)
Adafruit_SSD1306 display(SCREEN_WIDTH, SCREEN_HEIGHT, &Wire, OLED_RESET);

#define NUMFLAKES     10 // Number of snowflakes in the animation example

#define LOGO_HEIGHT   16
#define LOGO_WIDTH    16
static const unsigned char PROGMEM logo_bmp[] =
{ B00000000, B11000000,
  B00000001, B11000000,
  B00000001, B11000000,
  B00000011, B11100000,
  B11110011, B11100000,
  B11111110, B11111000,
  B01111110, B11111111,
  B00110011, B10011111,
  B00011111, B11111100,
  B00001101, B01110000,
  B00011011, B10100000,
  B00111111, B11100000,
  B00111111, B11110000,
  B01111100, B11110000,
  B01110000, B01110000,
  B00000000, B00110000 };

void setup() {
  Serial.begin(9600);

  // SSD1306_SWITCHCAPVCC = generate display voltage from 3.3V internally
  if(!display.begin(SSD1306_SWITCHCAPVCC, 0x3C)) { // Address 0x3C for 128x32
    Serial.println(F("SSD1306 allocation failed"));
    for(;;); // Don't proceed, loop forever
  }

  // Show initial display buffer contents on the screen --
  // the library initializes this with an Adafruit splash screen.
  display.display();
  delay(2000); // Pause for 2 seconds

  // Clear the buffer
  display.clearDisplay();

  // Draw a single pixel in white
  display.drawPixel(10, 10, SSD1306_WHITE);

  // Show the display buffer on the screen. You MUST call display() after
  // drawing commands to make them visible on screen!
  display.display();
  delay(2000);
  // display.display() is NOT necessary after every single drawing command,
  // unless that's what you want...rather, you can batch up a bunch of
  // drawing operations and then update the screen all at once by calling
  // display.display(). These examples demonstrate both approaches...

  testdrawline();      // Draw many lines

  testdrawrect();      // Draw rectangles (outlines)

  testfillrect();      // Draw rectangles (filled)

  testdrawcircle();    // Draw circles (outlines)

  testfillcircle();    // Draw circles (filled)

  testdrawroundrect(); // Draw rounded rectangles (outlines)

  testfillroundrect(); // Draw rounded rectangles (filled)

  testdrawtriangle();  // Draw triangles (outlines)

  testfilltriangle();  // Draw triangles (filled)

  testdrawchar();      // Draw characters of the default font

  testdrawstyles();    // Draw 'stylized' characters

  testscrolltext();    // Draw scrolling text

  testdrawbitmap();    // Draw a small bitmap image

  // Invert and restore display, pausing in-between
  display.invertDisplay(true);
  delay(1000);
  display.invertDisplay(false);
  delay(1000);

  testanimate(logo_bmp, LOGO_WIDTH, LOGO_HEIGHT); // Animate bitmaps
}

void loop() {
}

void testdrawline() {
  int16_t i;

  display.clearDisplay(); // Clear display buffer

  for(i=0; i<display.width(); i+=4) {
    display.drawLine(0, 0, i, display.height()-1, SSD1306_WHITE);
    display.display(); // Update screen with each newly-drawn line
    delay(1);
  }
  for(i=0; i<display.height(); i+=4) {
    display.drawLine(0, 0, display.width()-1, i, SSD1306_WHITE);
    display.display();
    delay(1);
  }
  delay(250);

  display.clearDisplay();

  for(i=0; i<display.width(); i+=4) {
    display.drawLine(0, display.height()-1, i, 0, SSD1306_WHITE);
    display.display();
    delay(1);
  }
  for(i=display.height()-1; i>=0; i-=4) {
    display.drawLine(0, display.height()-1, display.width()-1, i, SSD1306_WHITE);
    display.display();
    delay(1);
  }
  delay(250);

  display.clearDisplay();

  for(i=display.width()-1; i>=0; i-=4) {
    display.drawLine(display.width()-1, display.height()-1, i, 0, SSD1306_WHITE);
    display.display();
    delay(1);
  }
  for(i=display.height()-1; i>=0; i-=4) {
    display.drawLine(display.width()-1, display.height()-1, 0, i, SSD1306_WHITE);
    display.display();
    delay(1);
  }
  delay(250);

  display.clearDisplay();

  for(i=0; i<display.height(); i+=4) {
    display.drawLine(display.width()-1, 0, 0, i, SSD1306_WHITE);
    display.display();
    delay(1);
  }
  for(i=0; i<display.width(); i+=4) {
    display.drawLine(display.width()-1, 0, i, display.height()-1, SSD1306_WHITE);
    display.display();
    delay(1);
  }

  delay(2000); // Pause for 2 seconds
}

void testdrawrect(void) {
  display.clearDisplay();

  for(int16_t i=0; i<display.height()/2; i+=2) {
    display.drawRect(i, i, display.width()-2*i, display.height()-2*i, SSD1306_WHITE);
    display.display(); // Update screen with each newly-drawn rectangle
    delay(1);
  }

  delay(2000);
}

void testfillrect(void) {
  display.clearDisplay();

  for(int16_t i=0; i<display.height()/2; i+=3) {
    // The INVERSE color is used so rectangles alternate white/black
    display.fillRect(i, i, display.width()-i*2, display.height()-i*2, SSD1306_INVERSE);
    display.display(); // Update screen with each newly-drawn rectangle
    delay(1);
  }

  delay(2000);
}

void testdrawcircle(void) {
  display.clearDisplay();

  for(int16_t i=0; i<max(display.width(),display.height())/2; i+=2) {
    display.drawCircle(display.width()/2, display.height()/2, i, SSD1306_WHITE);
    display.display();
    delay(1);
  }

  delay(2000);
}

void testfillcircle(void) {
  display.clearDisplay();

  for(int16_t i=max(display.width(),display.height())/2; i>0; i-=3) {
    // The INVERSE color is used so circles alternate white/black
    display.fillCircle(display.width() / 2, display.height() / 2, i, SSD1306_INVERSE);
    display.display(); // Update screen with each newly-drawn circle
    delay(1);
  }

  delay(2000);
}

void testdrawroundrect(void) {
  display.clearDisplay();

  for(int16_t i=0; i<display.height()/2-2; i+=2) {
    display.drawRoundRect(i, i, display.width()-2*i, display.height()-2*i,
      display.height()/4, SSD1306_WHITE);
    display.display();
    delay(1);
  }

  delay(2000);
}

void testfillroundrect(void) {
  display.clearDisplay();

  for(int16_t i=0; i<display.height()/2-2; i+=2) {
    // The INVERSE color is used so round-rects alternate white/black
    display.fillRoundRect(i, i, display.width()-2*i, display.height()-2*i,
      display.height()/4, SSD1306_INVERSE);
    display.display();
    delay(1);
  }

  delay(2000);
}

void testdrawtriangle(void) {
  display.clearDisplay();

  for(int16_t i=0; i<max(display.width(),display.height())/2; i+=5) {
    display.drawTriangle(
      display.width()/2  , display.height()/2-i,
      display.width()/2-i, display.height()/2+i,
      display.width()/2+i, display.height()/2+i, SSD1306_WHITE);
    display.display();
    delay(1);
  }

  delay(2000);
}

void testfilltriangle(void) {
  display.clearDisplay();

  for(int16_t i=max(display.width(),display.height())/2; i>0; i-=5) {
    // The INVERSE color is used so triangles alternate white/black
    display.fillTriangle(
      display.width()/2  , display.height()/2-i,
      display.width()/2-i, display.height()/2+i,
      display.width()/2+i, display.height()/2+i, SSD1306_INVERSE);
    display.display();
    delay(1);
  }

  delay(2000);
}

void testdrawchar(void) {
  display.clearDisplay();

  display.setTextSize(1);      // Normal 1:1 pixel scale
  display.setTextColor(SSD1306_WHITE); // Draw white text
  display.setCursor(0, 0);     // Start at top-left corner
  display.cp437(true);         // Use full 256 char 'Code Page 437' font

  // Not all the characters will fit on the display. This is normal.
  // Library will draw what it can and the rest will be clipped.
  for(int16_t i=0; i<256; i++) {
    if(i == '\n') display.write(' ');
    else          display.write(i);
  }

  display.display();
  delay(2000);
}

void testdrawstyles(void) {
  display.clearDisplay();

  display.setTextSize(1);             // Normal 1:1 pixel scale
  display.setTextColor(SSD1306_WHITE);        // Draw white text
  display.setCursor(0,0);             // Start at top-left corner
  display.println(F("Hello, world!"));

  display.setTextColor(SSD1306_BLACK, SSD1306_WHITE); // Draw 'inverse' text
  display.println(3.141592);

  display.setTextSize(2);             // Draw 2X-scale text
  display.setTextColor(SSD1306_WHITE);
  display.print(F("0x")); display.println(0xDEADBEEF, HEX);

  display.display();
  delay(2000);
}

void testscrolltext(void) {
  display.clearDisplay();

  display.setTextSize(2); // Draw 2X-scale text
  display.setTextColor(SSD1306_WHITE);
  display.setCursor(10, 0);
  display.println(F("scroll"));
  display.display();      // Show initial text
  delay(100);

  // Scroll in various directions, pausing in-between:
  display.startscrollright(0x00, 0x0F);
  delay(2000);
  display.stopscroll();
  delay(1000);
  display.startscrollleft(0x00, 0x0F);
  delay(2000);
  display.stopscroll();
  delay(1000);
  display.startscrolldiagright(0x00, 0x07);
  delay(2000);
  display.startscrolldiagleft(0x00, 0x07);
  delay(2000);
  display.stopscroll();
  delay(1000);
}

void testdrawbitmap(void) {
  display.clearDisplay();

  display.drawBitmap(
    (display.width()  - LOGO_WIDTH ) / 2,
    (display.height() - LOGO_HEIGHT) / 2,
    logo_bmp, LOGO_WIDTH, LOGO_HEIGHT, 1);
  display.display();
  delay(1000);
}

#define XPOS   0 // Indexes into the 'icons' array in function below
#define YPOS   1
#define DELTAY 2

void testanimate(const uint8_t *bitmap, uint8_t w, uint8_t h) {
  int8_t f, icons[NUMFLAKES][3];

  // Initialize 'snowflake' positions
  for(f=0; f< NUMFLAKES; f++) {
    icons[f][XPOS]   = random(1 - LOGO_WIDTH, display.width());
    icons[f][YPOS]   = -LOGO_HEIGHT;
    icons[f][DELTAY] = random(1, 6);
    Serial.print(F("x: "));
    Serial.print(icons[f][XPOS], DEC);
    Serial.print(F(" y: "));
    Serial.print(icons[f][YPOS], DEC);
    Serial.print(F(" dy: "));
    Serial.println(icons[f][DELTAY], DEC);
  }

  for(;;) { // Loop forever...
    display.clearDisplay(); // Clear the display buffer

    // Draw each snowflake:
    for(f=0; f< NUMFLAKES; f++) {
      display.drawBitmap(icons[f][XPOS], icons[f][YPOS], bitmap, w, h, SSD1306_WHITE);
    }

    display.display(); // Show the display buffer on the screen
    delay(200);        // Pause for 1/10 second

    // Then update coordinates of each flake...
    for(f=0; f< NUMFLAKES; f++) {
      icons[f][YPOS] += icons[f][DELTAY];
      // If snowflake is off the bottom of the screen...
      if (icons[f][YPOS] >= display.height()) {
        // Reinitialize to a random position, just off the top
        icons[f][XPOS]   = random(1 - LOGO_WIDTH, display.width());
        icons[f][YPOS]   = -LOGO_HEIGHT;
        icons[f][DELTAY] = random(1, 6);
      }
    }
  }
}

Comments (12)
سلام و خسته نباشید من این نمایشگر و سنسور دمای ds18b20 رو دارم و با استفاده از کد هایی که گذاشتین فعالشون کردم ولی نمیدونم چطور سریال مانیتور سنسور دما رو تو خود این نمایشگر نشون بدم لطفا کدشو بهم بدین لطفا?
سلام دوست عزیز.
در همین آموزش در قسمت کد، خط 300 تا 350 تابعهای مرتبط با نوشتن متن روی oled هست. با مطالعه اون قسمت به راحتی میتونید دمای دریافت شده از سنسور ds18b20 رو به جای سریال مانیتور، در نمایشگر oled نمایش بدید.
این آموزش هم راهاندازی سنسور ds18b20 با آردوینوئه: “https://thecaferobot.com/learn/interfacing-ds18b20-temperature-sensor-with-arduino-electropeak/”
درود
تعذیه این نمایشگر ۳.۳ ولت هست
با ۵ ولتی که فرمودید مشکلی نداره؟
با سلام
پشت 90 درصد از این نمایشگر ها یک عدد رگوراتور کاهنده وجود دارد که خروجی 3.3 ولتی مورد نیاز این نمایشگر ها را تامین میکند. (یک قطعه شیبیه ترانزیتسور با کد 662K)
برای همین میتوانید با خیال راحت تا حداکثر 6 ولت به ورودی تغذیه بدهید. اگر این قطعه نبود در این شرایط از 3.3 ولت باید استفاده بکنید (آن هم از 3.3 ولت روی برد آردوینو نباید استفاده بکنید – به دلیل جریان دهی پایین این پایه و بهتر است از یک رگوراتور کاهنده مانند AMS1117 برای این موضوع استفاده بکنید.)
هرکاری کردم ماژول راه اندازی نشد.هم با 3.3 و هم با 5 تست کردم.ولی نمایشگر اصلا روشن نمیشه.
با سلام
در مرحله اول با استفاده از I2C اسکنر بررسی بکنید که آدرس نمایشگر فعال می باشد یا خیر
در صورتی که آدرس را دریافت کردید و آدرس برابر بود با 0x3C همین کد را بر روی آردوینو خود آپلود بنمایید تا نمایشگر روشن بشود.
در صورتی که آدرسی دریافت نکردید یعنی سیم کشی اشتباه است در صورتی که آدرس های دیگری دریافت کردید با تغییر آدرس در کد دوباره همین کد را آپلود بنمایید.
داداش نوشتی راه اندازی LCD با استفاده از ارتباط I2C ولی کتابخونه SPI رو توی کد فراخونی کردی 🙂
نمیدونم خودت چجوری ازش جواب گرفتی
با سلام
دوست عزیز توجه بکنید در خط بعدی دستور فراخوانی Wire نیز زده شده است که مربوط به I2C می باشد.
ابتدا کد را نیز بررسی بکنید ذکر شده است که این نمونه سمپل خود کتابخانه هست و دخل و تصرفی در این کد انجام نشده است و همان کد نمونه کتابخانه قرار داده شده است.
ابتدا به کتابخانه Adafruit_SSD1306 مراجعه بکنید. در تمامی نمونه کد ها هر 2 کتابخانه Wire و SPI اجرا شده است.
این مورد را نیز در نظر داشته باشید تا زمانی که دستور SPI.begin اجرا نشود کتابخانه وارد حالت عدم استفاده میشود و در کد اجرا نمیشود. و به صورت کلی فرقی با قرار دادن و ندادن کتابخانه نمیکند.
ضمن تشکر
برنامه من ابتدا 0x3d بود و کار نمیکرد!
اونو تغییر دادم به 0x3c و نمایشگر روشن شد 😍
در حالیکه در کامنت برنامه نوشته 0x3c مخصوص رزولوشن 128×32 هستش
من فکر کنم اشتباهه . بخوانید
The OLED display module uses I2C communication and typically has two possible addresses: 0x3C and 0x3D. The default address is often 0x3C, but some modules may be configured for 0x3D. The specific address can be found in the module’s documentation or through an I2C scanner sketch.
کلا میگه پیش فرض نمایشگرها آدرسشون 0x3c هستش ولی بعضی 0x3d هستند
خوب پس این ربطی به رزولوشن نداره ظاهرا
با سلام
بله آدرس نمایشگر از پشت برد قابل تنظیم هست و به صورت دیفالت بر روی 0x3C می باشد.
کد موجود در سایت نیز بر روی 0x3C هست که نسخه دیفالت می باشد.
اگر دقت بنمایید در ابتدای کد اعلام شده است این کد نمونه مثال های خود نمایشگر می باشد و با تغییرات جزعی. از این رو تمام کامنت های وسط کد مربوط به نسخه اصلی می باشد.
سلام من یه نمایشگر oled خریدم ولی مشخصات نمایشگر با مشخصاتی که شما برای فعال سازی گفتید فرق داره اون مقاومتی برای تشخیص 0x3d بودن یا 0x3c نداره فقط ۱۱ تا مقاومت داره که c1 تا c7 داره و r1 تاr4.
لطفا راهنماییم کنید.
با سلام
این موارد سوال ها را در بخش انجمن مطرح بکنید تا بتوانید عکس نسخه ای که دارید را نیز ارسال بنمایید تا مورد بررسی قرار بگیرد.
همچنین در بعضی از نسخه ها امکان عوض کردن آدرس I2C وجود ندارد و بر روی 3C قفل شده است.