
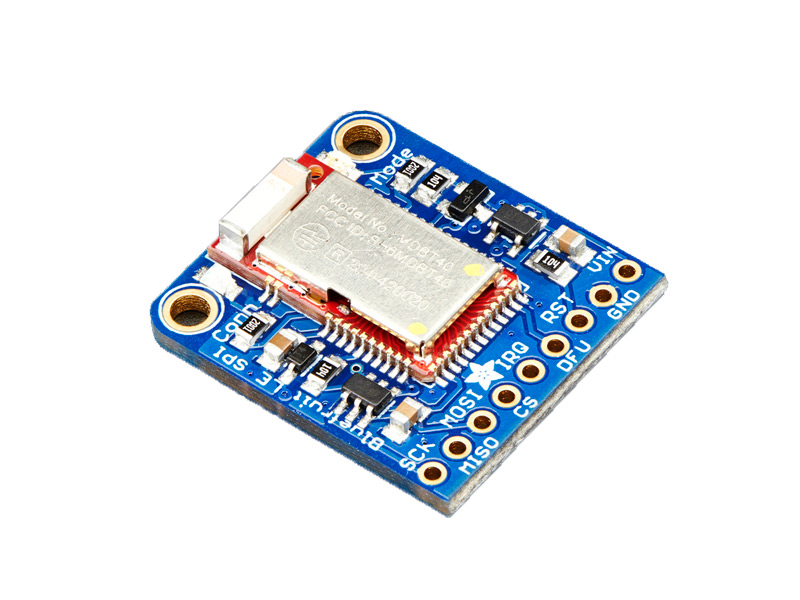
ویژگی های ماژول بلوتوث Adafruit Bluefruit LE SPI Friend
ماژولهای بلوتوث از جمله ماژولهای ارتباط بیسیم هستند که میتوان آنها را به صورت سریال یا SPI به پروژه اضافه کرد.
مزیت استفاده از ماژولهای بلوتوث راهاندازی راحت و آسان این ماژولها میباشد.
ماژول Adafruit Bluefruit LE SPI Friend از پروتکل SPI برای ارتباط استفاده میکند.
با استفاده از این ماژول میتوانید به راحتی اتصال بلوتوث را با هر برد دیگری، برقرار کنید. با استفاده از پروتکل SPI، دیگر لازم نیست نگران سرعت (baud rate)، کنترل جریان یا کنار گذاشتن پورت UART باشید.
قابلیتهای این ماژول بیش از تصور شماست. به دلیل یادگیری آسان مجموعه AT Command، شما میتوانید کنترل کاملی بر نحوه عملکرد دستگاه، از جمله امکان تعریف و تغییر در سرویسها و ویژگیهای GATT خود داشته باشید. همچنین میتوانید با استفاده از AT Command به منظور اطلاع از اتلاف دما، بررسی ولتاژ باتری، بررسی اتصال RSSI یا بررسی آدرس MAC و بررسی موارد دیگر استفاده کنید.
با استفاده از اپلیکیشن Bluefruit Connect که در دو نسخه iOS و Android موجود میباشد، میتوانید نسخه اولیه پروژه خود را دریافت کنید.
ماژول بلوتوث Bluefruit، همچنین میتواند به عنوان کیبورد HID عمل کند. (برای تجهیزاتی که از BLE HID پشتیبانی میکنند.)
نکته
جهت به روزرسانی Framework این ماژول نیاز است ماژول در مود DFU قرار بگیرد و از نرمافزار Bluefruit connect استفاده شود.
جهت تنظیم ماژول در حالت DFU نیاز است پایه DFU به GND متصل شود.
جهت دریافت دیتاشیت ماژول بلوتوث Adafruit Bluefruit LE SPI Friend اینجا کلیک کنید.
جهت دریافت اطلاعات بیشتر بلوتوث Adafruit Bluefruit LE SPI Friend اینجا کلیک کنید.
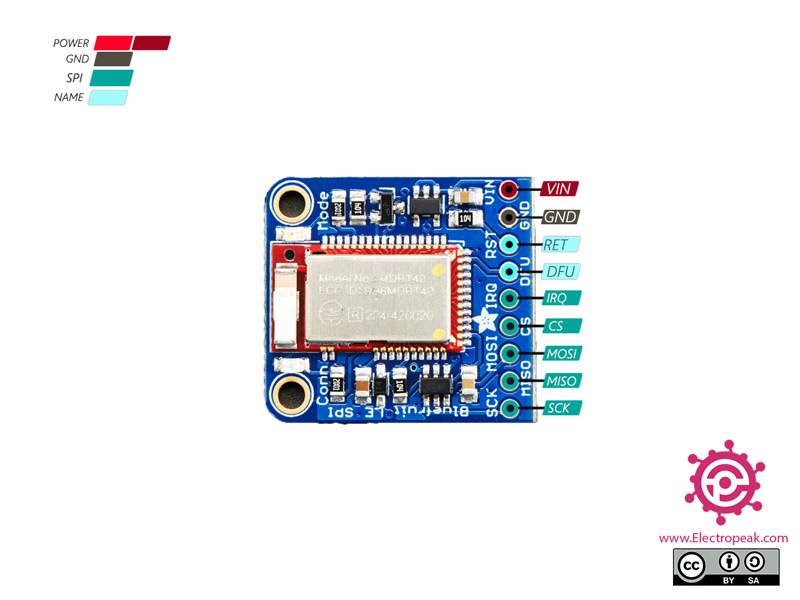
معرفی پایه ها (Pinout) ماژول بلوتوث Adafruit Bluefruit LE SPI Friend
ماژول بلوتوث Adafruit Bluefruit LE SPI Friend دارای 9 پایه به شرح زیر است:
- VIN: تغذیه ماژول – 6-3.6 ولت
- GND: زمین
- IRQ: وقفه از سوی ماژول
- SCK: همزمان سازی برای پروتکل SPI
- MOSI: خط ارسالی اطلاعات برای پروتکل SPI
- MISO: خط دریافتی اطلاعات برای پروتکل SPI
- CS: انتخاب دستگاه های زیر مجموعه برای پروتکل SPI
- RET: ریست کردن ماژول
- DFU: تنظیم ماژول در مود DFU
لوازمی که به آن احتیاج دارید
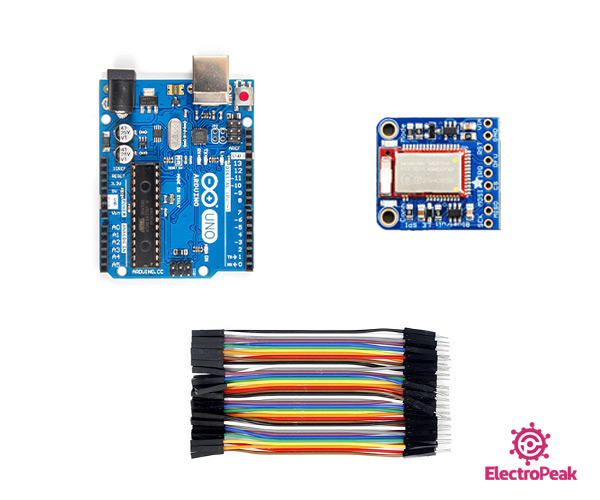
قطعات مورد نیاز
نرم افزارهای مورد نیاز
راهاندازی ماژول بلوتوث Adafruit Bluefruit LE SPI Friend با آردوینو
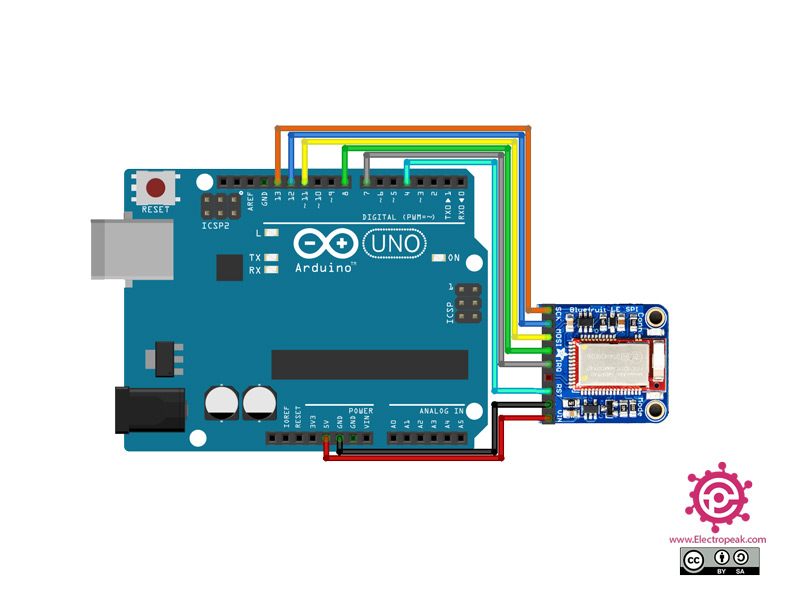
گام اول: سیم بندی
مطابق مدار زیر، ماژول را به آردوینو وصل کنید.
گام دوم: نصب کتابخانه
کتابخانه زیر را بر آردوینوی خود نصب کنید.
https://learn.adafruit.com/introducing-the-adafruit-bluefruit-spi-breakout/software
توجه
اگر نیاز به راهنمایی بیشتر برای نصب کتابخانه بر روی آردوینو دارید، می توانید به آموزش نصب کتابخانه بر آردوینو مراجعه کنید.
گام سوم: کد
کد زیر را روی برد آردوینوی خود آپلود کنید.
    /*********************************************************************
 This is an example for our nRF51822 based Bluefruit LE modules

 Pick one up today in the adafruit shop!

 Adafruit invests time and resources providing this open source code,
 please support Adafruit and open-source hardware by purchasing
 products from Adafruit!

 MIT license, check LICENSE for more information
 All text above, and the splash screen below must be included in
 any redistribution
*********************************************************************/

#include <Arduino.h>
#include <SPI.h>
#include "Adafruit_BLE.h"
#include "Adafruit_BluefruitLE_SPI.h"
#include "Adafruit_BluefruitLE_UART.h"

#include "BluefruitConfig.h"

#if SOFTWARE_SERIAL_AVAILABLE
  #include <SoftwareSerial.h>
#endif

/*=========================================================================
    APPLICATION SETTINGS

    FACTORYRESET_ENABLE       Perform a factory reset when running this sketch

                              Enabling this will put your Bluefruit LE module
                              in a 'known good' state and clear any config
                              data set in previous sketches or projects, so
                              running this at least once is a good idea.

                              When deploying your project, however, you will
                              want to disable factory reset by setting this
                              value to 0.  If you are making changes to your
                              Bluefruit LE device via AT commands, and those
                              changes aren't persisting across resets, this
                              is the reason why.  Factory reset will erase
                              the non-volatile memory where config data is
                              stored, setting it back to factory default
                              values.

                              Some sketches that require you to bond to a
                              central device (HID mouse, keyboard, etc.)
                              won't work at all with this feature enabled
                              since the factory reset will clear all of the
                              bonding data stored on the chip, meaning the
                              central device won't be able to reconnect.
    MINIMUM_FIRMWARE_VERSION  Minimum firmware version to have some new features
    MODE_LED_BEHAVIOUR        LED activity, valid options are
                              "DISABLE" or "MODE" or "BLEUART" or
                              "HWUART"  or "SPI"  or "MANUAL"
    -----------------------------------------------------------------------*/
    #define FACTORYRESET_ENABLE         1
    #define MINIMUM_FIRMWARE_VERSION    "0.6.6"
    #define MODE_LED_BEHAVIOUR          "MODE"
/*=========================================================================*/

// Create the bluefruit object, either software serial...uncomment these lines
/*
SoftwareSerial bluefruitSS = SoftwareSerial(BLUEFRUIT_SWUART_TXD_PIN, BLUEFRUIT_SWUART_RXD_PIN);

Adafruit_BluefruitLE_UART ble(bluefruitSS, BLUEFRUIT_UART_MODE_PIN,
                      BLUEFRUIT_UART_CTS_PIN, BLUEFRUIT_UART_RTS_PIN);
*/

/* ...or hardware serial, which does not need the RTS/CTS pins. Uncomment this line */
// Adafruit_BluefruitLE_UART ble(Serial1, BLUEFRUIT_UART_MODE_PIN);

/* ...hardware SPI, using SCK/MOSI/MISO hardware SPI pins and then user selected CS/IRQ/RST */
Adafruit_BluefruitLE_SPI ble(BLUEFRUIT_SPI_CS, BLUEFRUIT_SPI_IRQ, BLUEFRUIT_SPI_RST);

/* ...software SPI, using SCK/MOSI/MISO user-defined SPI pins and then user selected CS/IRQ/RST */
//Adafruit_BluefruitLE_SPI ble(BLUEFRUIT_SPI_SCK, BLUEFRUIT_SPI_MISO,
//                             BLUEFRUIT_SPI_MOSI, BLUEFRUIT_SPI_CS,
//                             BLUEFRUIT_SPI_IRQ, BLUEFRUIT_SPI_RST);


// A small helper
void error(const __FlashStringHelper*err) {
  Serial.println(err);
  while (1);
}

/**************************************************************************/
/*!
    @brief  Sets up the HW an the BLE module (this function is called
            automatically on startup)
*/
/**************************************************************************/
void setup(void)
{
  while (!Serial);  // required for Flora & Micro
  delay(500);

  Serial.begin(115200);
  Serial.println(F("Adafruit Bluefruit Command Mode Example"));
  Serial.println(F("---------------------------------------"));

  /* Initialise the module */
  Serial.print(F("Initialising the Bluefruit LE module: "));

  if ( !ble.begin(VERBOSE_MODE) )
  {
    error(F("Couldn't find Bluefruit, make sure it's in CoMmanD mode & check wiring?"));
  }
  Serial.println( F("OK!") );

  if ( FACTORYRESET_ENABLE )
  {
    /* Perform a factory reset to make sure everything is in a known state */
    Serial.println(F("Performing a factory reset: "));
    if ( ! ble.factoryReset() ){
      error(F("Couldn't factory reset"));
    }
  }

  /* Disable command echo from Bluefruit */
  ble.echo(false);

  Serial.println("Requesting Bluefruit info:");
  /* Print Bluefruit information */
  ble.info();

  Serial.println(F("Please use Adafruit Bluefruit LE app to connect in UART mode"));
  Serial.println(F("Then Enter characters to send to Bluefruit"));
  Serial.println();

  ble.verbose(false);  // debug info is a little annoying after this point!

  /* Wait for connection */
  while (! ble.isConnected()) {
      delay(500);
  }

  // LED Activity command is only supported from 0.6.6
  if ( ble.isVersionAtLeast(MINIMUM_FIRMWARE_VERSION) )
  {
    // Change Mode LED Activity
    Serial.println(F("******************************"));
    Serial.println(F("Change LED activity to " MODE_LED_BEHAVIOUR));
    ble.sendCommandCheckOK("AT+HWModeLED=" MODE_LED_BEHAVIOUR);
    Serial.println(F("******************************"));
  }
}

/**************************************************************************/
/*!
    @brief  Constantly poll for new command or response data
*/
/**************************************************************************/
void loop(void)
{
  // Check for user input
  char inputs[BUFSIZE+1];

  if ( getUserInput(inputs, BUFSIZE) )
  {
    // Send characters to Bluefruit
    Serial.print("[Send] ");
    Serial.println(inputs);

    ble.print("AT+BLEUARTTX=");
    ble.println(inputs);

    // check response stastus
    if (! ble.waitForOK() ) {
      Serial.println(F("Failed to send?"));
    }
  }

  // Check for incoming characters from Bluefruit
  ble.println("AT+BLEUARTRX");
  ble.readline();
  if (strcmp(ble.buffer, "OK") == 0) {
    // no data
    return;
  }
  // Some data was found, its in the buffer
  Serial.print(F("[Recv] ")); Serial.println(ble.buffer);
  ble.waitForOK();
}

/**************************************************************************/
/*!
    @brief  Checks for user input (via the Serial Monitor)
*/
/**************************************************************************/
bool getUserInput(char buffer[], uint8_t maxSize)
{
  // timeout in 100 milliseconds
  TimeoutTimer timeout(100);

  memset(buffer, 0, maxSize);
  while( (!Serial.available()) && !timeout.expired() ) { delay(1); }

  if ( timeout.expired() ) return false;

  delay(2);
  uint8_t count=0;
  do
  {
    count += Serial.readBytes(buffer+count, maxSize);
    delay(2);
  } while( (count < maxSize) && (Serial.available()) );

  return true;
}
این کد جهت تست ارتباط مابین سریال مانیتور آردوینو و دستگاهی که به ماژول بلوتوث متصل شده است، میباشد.
