ویژگی های سنسور وزن YZC-161B
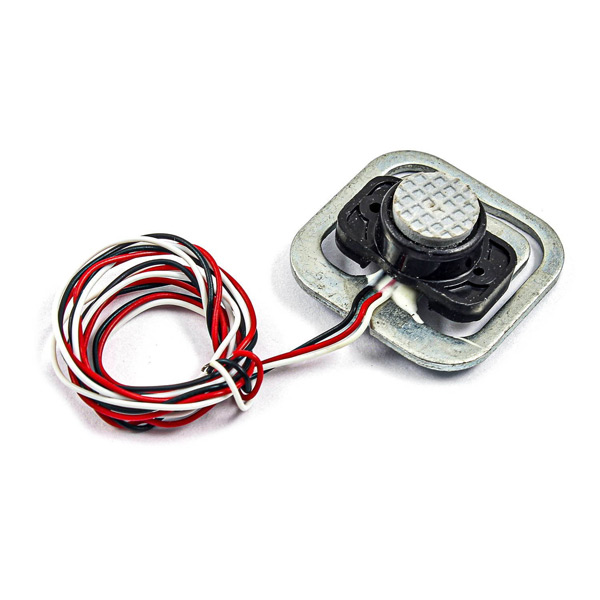
لود سل ها حسگر هایی الکترونیکی هستند که برای اندازه گیری وزن و نیرو مورد استفاده قرار می گیرند. ساختار یک لود سل از بدنه ی آلیاژی و تعدادی مقاومت کششی است که با اعمال نیرو تغییر مقدار میدهند و با برداشتن نیرو، دوباره به مقدار اولیه ی خود باز میگردند. ظرفیت یک لود سل حداکثر میزان نیروی قابل تحمل برای آن است.
توجه
- برای اندازه گیری تغییرات مقاومت کششی از ماژول HX711 استفاده می کنیم که یک مبدل آنالوگ به دیجیتال با دقت بالا می باشد.
- این ماژول از ارتباط I2C استفاده نمی کند.
- برای راه اندازی این سنسور نیازمند استفاده از حداقل 2 یا 4 عدد از این سنسور ها هستیم و یا اینکه می توانیم از 2 عدد مقاومت 1 کیلو اهم برای کامل کردن پل وتسون استفاده کنیم.
جهت دریافت دیتاشیت ماژول وزن YZC-161B اینجا کلیک کنید.
معرفی پایه ها (Pinout) سنسور وزن YZC-161B
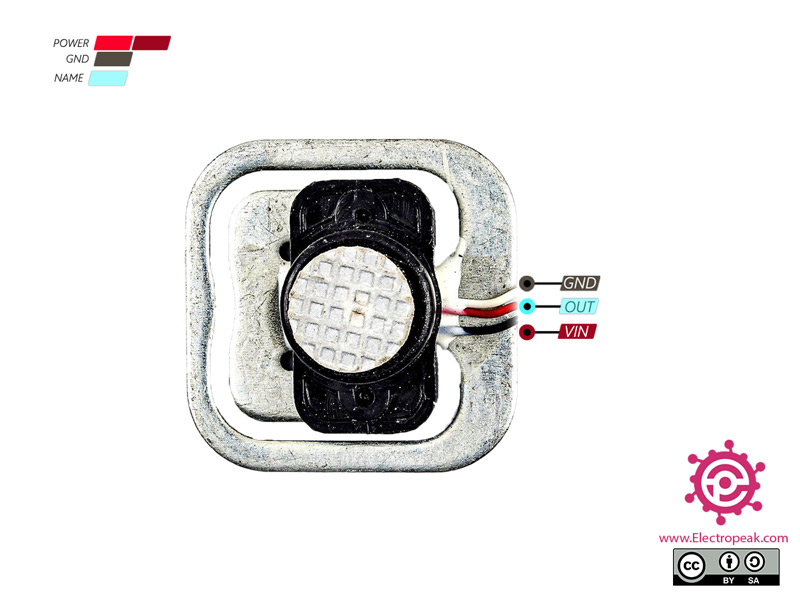
سنسور YZC-161B دارای 3 پایه به شرح زیر است:
- VIN: تغذیه ماژول –5 ولت
- GND: زمین
- OUT: خروجی ماژول به صورت دیجیتال
پین اوت (Pinout) این سنسور را می توانید در تصویر زیر مشاهده کنید.
لوازمی که به آن احتیاج دارید
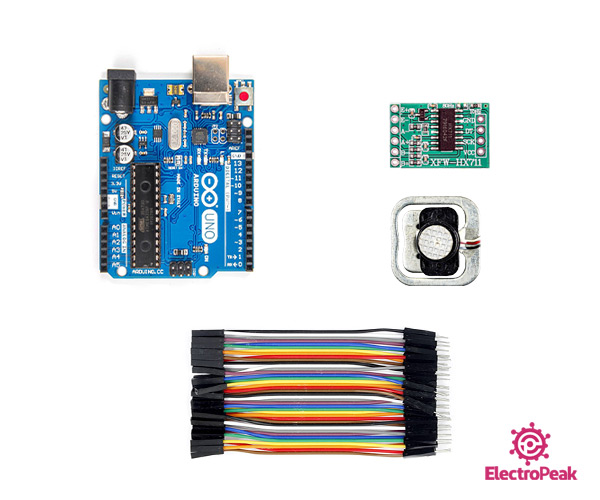
قطعات مورد نیاز
نرم افزارهای مورد نیاز
راه اندازی سنسور وزن YZC-161B با آردوینو
گام اول: سیم بندی
مطابق مدار زیر، سنسور را به آردوینو وصل کنید.

گام دوم: نصب کتابخانه
کتابخانه زیر را بر آردوینوی خود نصب کنید.
توجه
اگر نیاز به راهنمایی بیشتر برای نصب کتابخانه بر روی آردوینو دارید، می توانید به آموزش نصب کتابخانه بر آردوینو مراجعه کنید.
گام سوم: کد
کد زیر را روی برد آردوینوی خود آپلود کنید.
    /*
modified on Sep 21, 2020
Modified by MohammedDamirchi from https://github.com/sparkfun/HX711-Load-Cell-Amplifier base on https://circuitjournal.com/50kg-load-cells-with-HX711
https://electropeak.com/learn/
*/


/*
   This example file shows how to calibrate the load cell and optionally store the calibration
   value in EEPROM, and also how to change the value manually.
   The result value can then later be included in your project sketch or fetched from EEPROM.

   To implement calibration in your project sketch the simplified procedure is as follow:
       LoadCell.tare();
       //place known mass
       LoadCell.refreshDataSet();
       float newCalibrationValue = LoadCell.getNewCalibration(known_mass);
*/

#include <HX711_ADC.h>
#include <EEPROM.h>

//pins:
const int HX711_dout = 3; //mcu > HX711 dout pin
const int HX711_sck = 2; //mcu > HX711 sck pin

//HX711 constructor:
HX711_ADC LoadCell(HX711_dout, HX711_sck);

const int calVal_eepromAdress = 0;
long t;

void setup() {
  Serial.begin(57600); delay(10);
  Serial.println();
  Serial.println("Starting...");

  LoadCell.begin();
  long stabilizingtime = 2000; // preciscion right after power-up can be improved by adding a few seconds of stabilizing time
  boolean _tare = false; //set this to false if you don't want tare to be performed in the next step
  LoadCell.start(stabilizingtime, _tare);
  if (LoadCell.getTareTimeoutFlag() || LoadCell.getSignalTimeoutFlag()) {
    Serial.println("Timeout, check MCU>HX711 wiring and pin designations");
    while (1);
  }
  else {
    LoadCell.setCalFactor(1.0); // user set calibration value (float), initial value 1.0 may be used for this sketch
    Serial.println("Startup is complete");
  }
  while (!LoadCell.update());
  calibrate(); //start calibration procedure
}

void loop() {
  static boolean newDataReady = 0;
  const int serialPrintInterval = 0; //increase value to slow down serial print activity

  // check for new data/start next conversion:
  if (LoadCell.update()) newDataReady = true;

  // get smoothed value from the dataset:
  if (newDataReady) {
    if (millis() > t + serialPrintInterval) {
      float i = LoadCell.getData();
      Serial.print("Load_cell output val: ");
      Serial.println(i);
      newDataReady = 0;
      t = millis();
    }
  }

  // receive command from serial terminal
  if (Serial.available() > 0) {
    float i;
    char inByte = Serial.read();
    if (inByte == 't') LoadCell.tareNoDelay(); //tare
    else if (inByte == 'r') calibrate(); //calibrate
    else if (inByte == 'c') changeSavedCalFactor(); //edit calibration value manually
  }

  // check if last tare operation is complete
  if (LoadCell.getTareStatus() == true) {
    Serial.println("Tare complete");
  }

}

void calibrate() {
  Serial.println("***");
  Serial.println("Start calibration:");
  Serial.println("Place the load cell an a level stable surface.");
  Serial.println("Remove any load applied to the load cell.");
  Serial.println("Send 't' from serial monitor to set the tare offset.");

  boolean _resume = false;
  while (_resume == false) {
    LoadCell.update();
    if (Serial.available() > 0) {
      if (Serial.available() > 0) {
        float i;
        char inByte = Serial.read();
        if (inByte == 't') LoadCell.tareNoDelay();
      }
    }
    if (LoadCell.getTareStatus() == true) {
      Serial.println("Tare complete");
      _resume = true;
    }
  }

  Serial.println("Now, place your known mass on the loadcell.");
  Serial.println("Then send the weight of this mass (i.e. 100.0) from serial monitor.");

  float known_mass = 0;
  _resume = false;
  while (_resume == false) {
    LoadCell.update();
    if (Serial.available() > 0) {
      known_mass = Serial.parseFloat();
      if (known_mass != 0) {
        Serial.print("Known mass is: ");
        Serial.println(known_mass);
        _resume = true;
      }
    }
  }

  LoadCell.refreshDataSet(); //refresh the dataset to be sure that the known mass is measured correct
  float newCalibrationValue = LoadCell.getNewCalibration(known_mass); //get the new calibration value

  Serial.print("New calibration value has been set to: ");
  Serial.print(newCalibrationValue);
  Serial.println(", use this as calibration value (calFactor) in your project sketch.");
  Serial.print("Save this value to EEPROM adress ");
  Serial.print(calVal_eepromAdress);
  Serial.println("? y/n");

  _resume = false;
  while (_resume == false) {
    if (Serial.available() > 0) {
      char inByte = Serial.read();
      if (inByte == 'y') {
#if defined(ESP8266)|| defined(ESP32)
        EEPROM.begin(512);
#endif
        EEPROM.put(calVal_eepromAdress, newCalibrationValue);
#if defined(ESP8266)|| defined(ESP32)
        EEPROM.commit();
#endif
        EEPROM.get(calVal_eepromAdress, newCalibrationValue);
        Serial.print("Value ");
        Serial.print(newCalibrationValue);
        Serial.print(" saved to EEPROM address: ");
        Serial.println(calVal_eepromAdress);
        _resume = true;

      }
      else if (inByte == 'n') {
        Serial.println("Value not saved to EEPROM");
        _resume = true;
      }
    }
  }

  Serial.println("End calibration");
  Serial.println("***");
  Serial.println("To re-calibrate, send 'r' from serial monitor.");
  Serial.println("For manual edit of the calibration value, send 'c' from serial monitor.");
  Serial.println("***");
}

void changeSavedCalFactor() {
  float oldCalibrationValue = LoadCell.getCalFactor();
  boolean _resume = false;
  Serial.println("***");
  Serial.print("Current value is: ");
  Serial.println(oldCalibrationValue);
  Serial.println("Now, send the new value from serial monitor, i.e. 696.0");
  float newCalibrationValue;
  while (_resume == false) {
    if (Serial.available() > 0) {
      newCalibrationValue = Serial.parseFloat();
      if (newCalibrationValue != 0) {
        Serial.print("New calibration value is: ");
        Serial.println(newCalibrationValue);
        LoadCell.setCalFactor(newCalibrationValue);
        _resume = true;
      }
    }
  }
  _resume = false;
  Serial.print("Save this value to EEPROM adress ");
  Serial.print(calVal_eepromAdress);
  Serial.println("? y/n");
  while (_resume == false) {
    if (Serial.available() > 0) {
      char inByte = Serial.read();
      if (inByte == 'y') {
#if defined(ESP8266)|| defined(ESP32)
        EEPROM.begin(512);
#endif
        EEPROM.put(calVal_eepromAdress, newCalibrationValue);
#if defined(ESP8266)|| defined(ESP32)
        EEPROM.commit();
#endif
        EEPROM.get(calVal_eepromAdress, newCalibrationValue);
        Serial.print("Value ");
        Serial.print(newCalibrationValue);
        Serial.print(" saved to EEPROM address: ");
        Serial.println(calVal_eepromAdress);
        _resume = true;
      }
      else if (inByte == 'n') {
        Serial.println("Value not saved to EEPROM");
        _resume = true;
      }
    }
  }
  Serial.println("End change calibration value");
  Serial.println("***");
  }
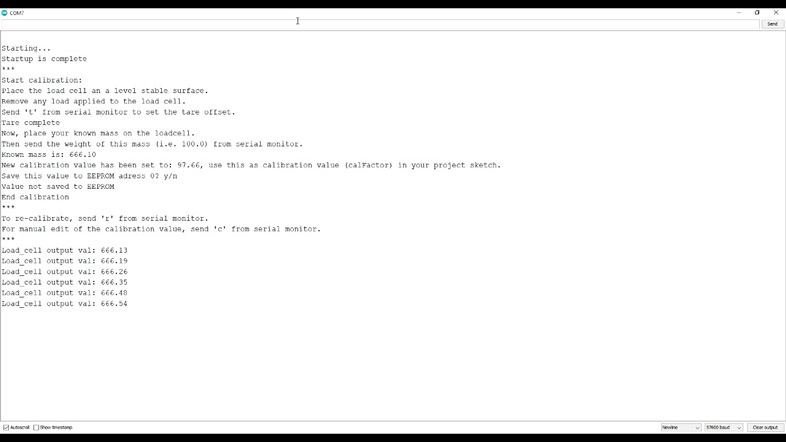
پس از آپلود کد، می توانید نتایج را در سریال مانیتور مشاهده کنید.
وزنه های روی ماژول را برداشته و حرف t را ارسال نمایید.
سپس یک وزنه با مقدار مشخص بر روی سنسور قرار داده و مقدار وزن آن را وارد نمایید.
حال ماژول آماده کار می باشد.