


ماژول رله 12 ولت یک کاناله دارای جامپر تعیین سطح تریگر
- +25 3 % 137٬200 تومان
- +50 7 % 132٬500 تومان
- +100 10 % 127٬800 تومان
- +300 13 % 123٬000 تومان
- +500 17 % 118٬300 تومان


رلهها سوئیچهای الکتریکی هستند که از الکترومغناطیس برای سوئیچ کردن بین دو حالت استفاده میکنند. این قطعات با اتصال پایههای ورودی و خروجی به بخشهای مختلف مدار، وظیفه سوئیچ کردن را بر عهده دارند. برخی رلهها دارای بیش از یک سوئیچ هستند که بسته به مدل، ممکن است با دیتاشیت مشخص شوند. ماژول رله 12 ولت تک کاناله، یک ماژول سوئیچینگ چندمنظوره است که امکان کنترل مدارهای با ولتاژ و جریان بالا را با میکروکنترلرها یا دستگاههای کنترلی ولتاژ پایین فراهم میکند.
این ماژول قابلیت انتخاب سطح تریگر (HIGH یا LOW) را از طریق جامپر دارد و به همین دلیل با طیف گستردهای از میکروکنترلرها و دستگاههای کنترلی سازگار است. ظرفیت بار رله حداکثر 10 آمپر در 250 ولت AC یا 30 ولت DC میباشد که آن را برای کاربردهای مختلفی مانند کنترل چراغها، فنها، موتورها و سایر وسایل برقی مناسب میکند.
مشخصات فنی ماژول رله 12 ولت یک کاناله دارای جامپر تعیین سطح تریگر
- نوع: ماژول رله
- تعداد کانالها: 1 کانال
- ولتاژ کاری: 12 ولت DC
- جریان کاری: 190 میلیآمپر
- جریان تریگر: 3 میلیآمپر ~ 5 میلیآمپر
- سطوح تریگر: قابل انتخاب بین HIGH یا LOW با استفاده از جامپر
- ولتاژ تریگر سطح پایین: 0 ~ 1.5 ولت
- ولتاژ تریگر سطح بالا: 3 ~ 5 ولت
- ظرفیت بار: 10 آمپر در 250VAC یا 30VDC
- بلوک ترمینال: بلوک ترمینال پیچی برای اتصال آسان به مدارهای خارجی
- نشانگر LED: دارای LED برای نمایش وضعیت فعالسازی رله
- نصب: دارای سوراخهای نصب
- ابعاد: 50x26x18.5 میلیمتر
ویژگیهای ماژول رله 12 ولت یک کاناله دارای جامپر تعیین سطح تریگر
- انتخاب سطح تریگر: با استفاده از جامپر میتوان سطح تریگر را بین HIGH و LOW تنظیم کرد.
- بلوک ترمینال: شامل بلوک ترمینال برای اتصال آسان به مدارهای خارجی.
- نشانگر LED: وضعیت فعالسازی رله را نمایش میدهد.
نکات استفاده از ماژول رله 12 ولت یک کاناله دارای جامپر تعیین سطح تریگر
- بررسی مقادیر مجاز: اطمینان حاصل کنید که ولتاژ و جریان ماژول رله با نیازهای بار شما سازگار است.
- استفاده از منبع تغذیه خارجی: برای تأمین انرژی ماژول از منبع تغذیه 12 ولت استفاده کنید.
- پیکربندی NO و NC: برای پروژه خود نوع پیکربندی (معمولاً باز یا بسته) را شناسایی کرده و بهدرستی سیمکشی کنید.
- بررسی سیگنال ورودی: ولتاژ موردنیاز برای فعالسازی رله را بررسی کرده و با دستگاه کنترل مطابقت دهید.
- محافظت از مدار: در صورت کار با بارهای القایی، حتماً دیود هرزگرد برای حفاظت در برابر نیروهای الکترو موتوری معکوس نصب کنید.
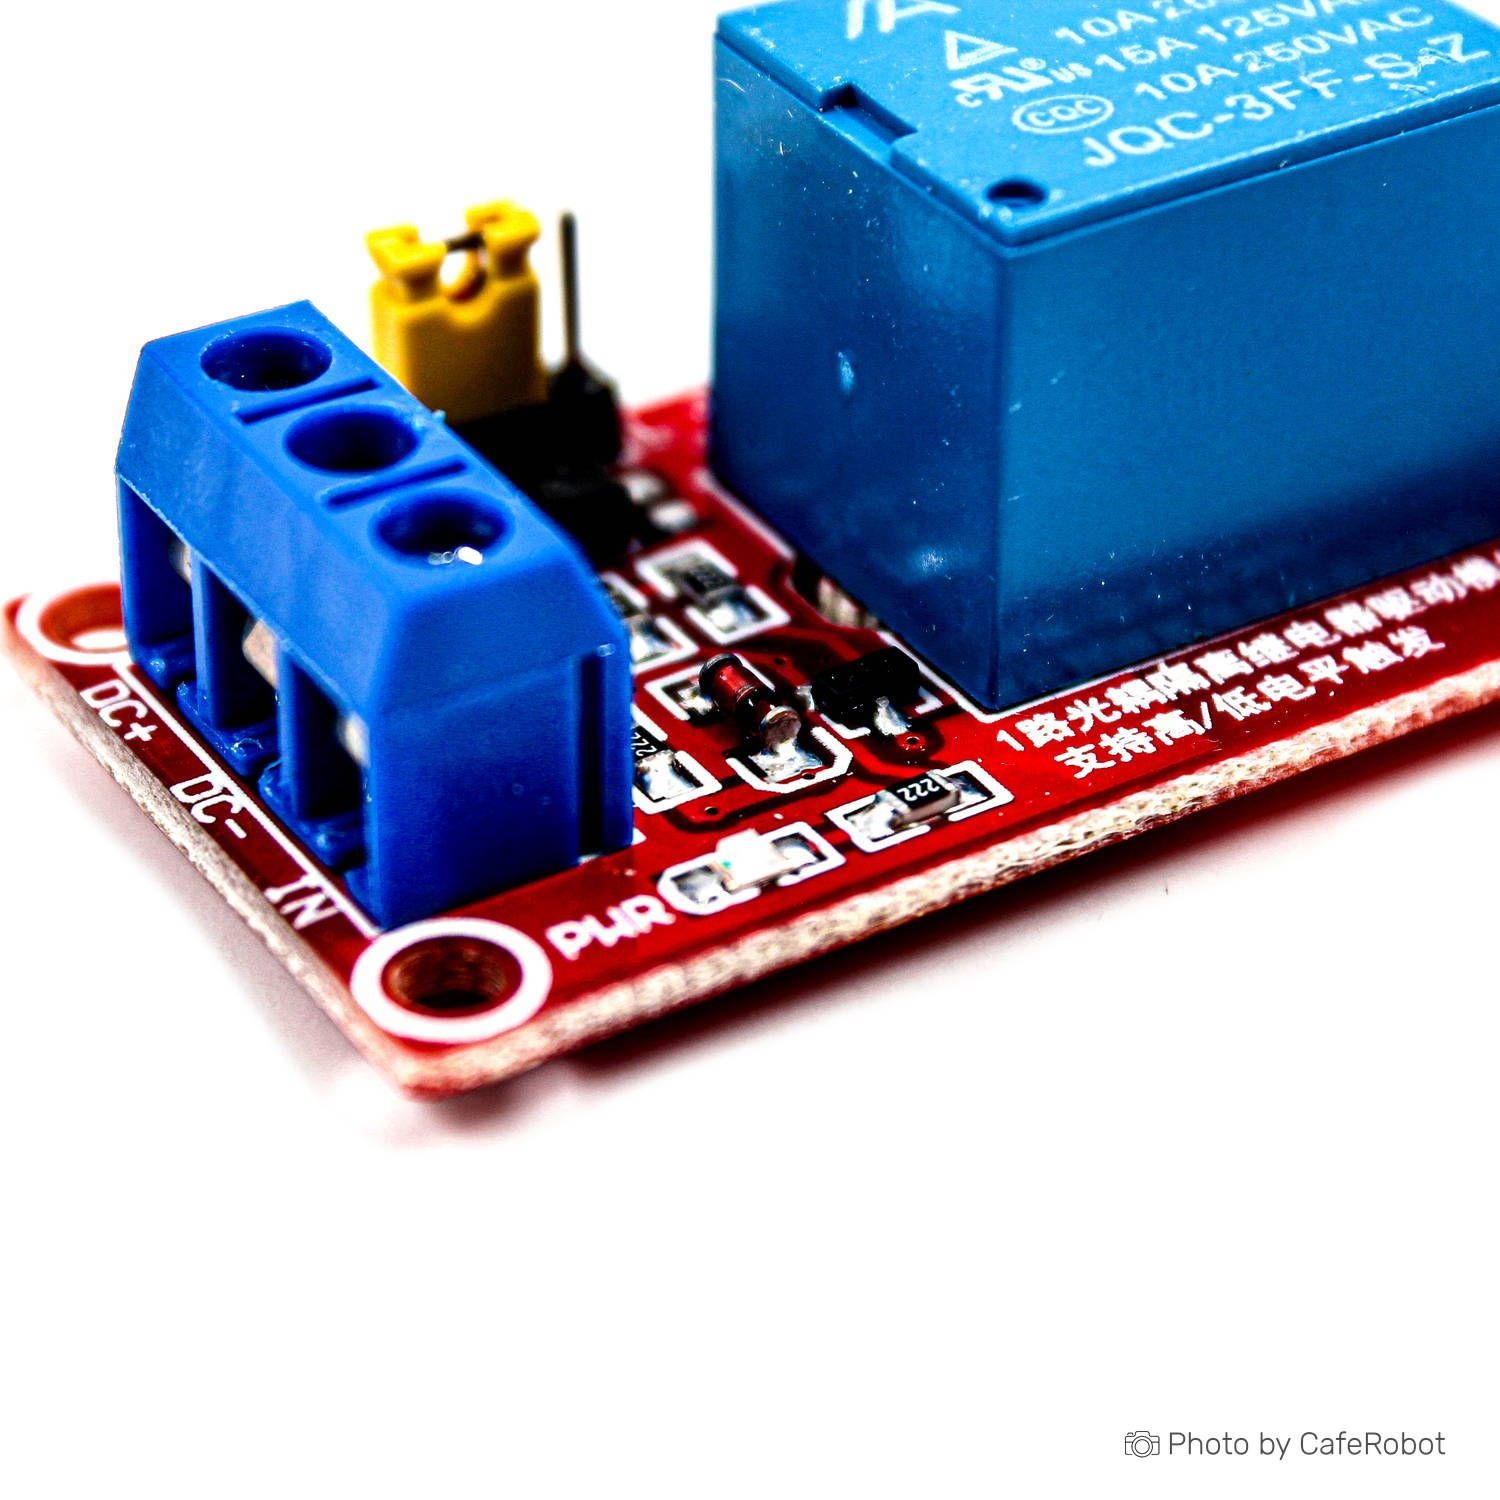
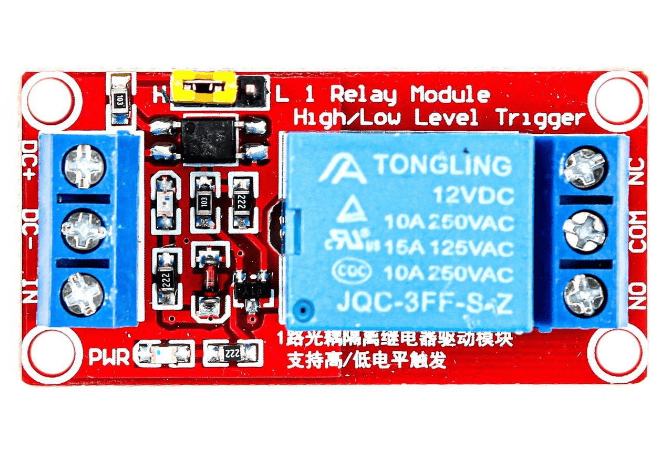
پینهای ماژول رله 12 ولت یک کاناله دارای جامپر تعیین سطح تریگر
ورودیها:
- DC+: تغذیه مثبت (12 ولت)
- DC-: اتصال زمین و سیگنال ورودی
- IN: سیگنال فعالسازی رله که میتواند HIGH یا LOW باشد
خروجیهای رله:
- NO: رابط معمولاً باز
- COM: رابط مشترک رلهها
- NC: رابط معمولاً بسته
این ماژول رله تک کاناله 12 ولت گزینهای ایدهآل برای پروژههای اتوماسیون، رباتیک و کنترل الکترونیکی دستگاهها میباشد که به کنترل از راه دور یا اتوماتیک نیاز دارند.
The 1-Channel Relay Module is a versatile switching module designed to control high-voltage and high-current circuits with a low-voltage microcontroller or other control devices. This module is specifically designed for 12V DC operation and features a single channel, allowing you to control one circuit at a time.
One notable feature of this relay module is the ability to select the trigger level (HIGH or LOW) using a jumper. This flexibility makes it compatible with a wide range of microcontrollers and control devices, as you can configure it to trigger with either a HIGH or LOW input signal.
The relay module typically provides a load capacity of up to 10A at 250VAC or 30VDC, making it suitable for a variety of applications, such as controlling lights, fans, motors, and other electrical appliances.
Additionally, it includes a terminal block for easy connection to external circuits, an LED indicator to display the relay's activation status, and a freewheeling diode to protect against back electromotive force when switching inductive loads.
This relay module is commonly used in automation, robotics, home automation, and various electronic projects where remote or automated control of electrical devices is required.
Key features of 1-Channel Relay Module - 12V (High and Low Level Trigger)
- Trigger level Selection: You can select the trigger level of this module between HIGH and LOW using a jumper. By this flexibility, you can configure it to trigger with either a HIGH or LOW input signal.
- Terminal block: This module includes a terminal block for easy connection to external circuits.
- LED indicator: You can check the relay's activation status a LED on module.
Specifications of 1-Channel Relay Module - 12V (High and Low Level Trigger)
- Type: Relay Module
- Number of Channels: 1 channel
- Operating Voltage: 12V DC
- Working Current: 190mA
- Trigger Current: 3mA ~ 5mA
- Trigger Levels: Selectable trigger level using a jumper (HIGH or LOW)
- Low-Level Trigger Voltage: 0V ~ 1.5V
- High-Level Trigger Voltage: 3V ~ 5V
- Load Capacity: 10A at 250VAC or 30VDC
- Terminal Block: Screw terminal block for easy connection to external circuits
- LED Indicator: Includes an indicator LED to show relay activation status
- Mounting: mounting holes
- Dimensions: 50mm x 26mm x 18.5mm
Usage tips of 1-Channel Relay Module - 12V (High and Low Level Trigger)
- Check Ratings: Ensure that the voltage and current ratings of the relay module match the requirements of your load.
- Use External Power Supply: Use a 12v external power supply to energize the relay module.
- Connect the ground pins of the relay power supply (12V) and the microcontroller board.
- Understand NO and NC Configurations: Understand whether the relay's contacts are normally open (NO) or normally closed (NC) and wire accordingly based on your project requirements.
- Check Input Signal Voltage: Verify the voltage required to activate the relay and ensure compatibility with the control device (3.3/5v are functional).
- Check Polarity: observe polarity of the input to avoid damage during connections.
- If the allowed voltage or current is exceeded, depending on the amount of the exceedance, the relay contacts will be damaged due to the occurrence of arc and will lose their function over time. Look at the image below.
- Exercise caution when working with high-voltage circuits, and ensure proper isolation and protection to prevent electrical hazards. Double-check the wiring and connections before applying power to the relay module.
- Install freewheeling diode to protect against back electromotive force when switching inductive loads.

Pinout of 1-Channel Relay Module - 12V (High and Low Level Trigger)
Inputs:
- DC+: Positive power supply (12V)
- DC-: Connect power and “In signal” negative
- IN: Relay module signal to trigger the end, you can set a high or low level control relay
Relay outputs:
- NO: Normally open relay interface
- COM: Common Interface Relays
- NC: Normally closed relay interface
| Interface Type | Digital |
|---|---|
| Operating Voltage (V) | 12V |
| Operating Current (mA) | 190 |
| Dimensions (mm) | 50x26x18.5 |
| شیوه نصب | Screw holes |
| Control Type | Relay (Electromechanical) |
| Channel Count | 1 |
| Switching Capacity | 10A/250VAC or 30VDC |
| Load Current (A) | 10 |
| Control Signal | Digital |
| LED Count | 1 |
| Relay Type | Relay output |
| Trigger Level | High and Low Level Trigger |
| Material | PCB |
| Input Type (AC/DC) | DC |